Showing posts with label Tips. Show all posts

Friday, June 26, 2026

How to change C# version in Visual Studio

You can change the C# language version in Visual Studio in several ways.
Method 1: Project Properties (recommended)

  1. Open your project in Visual Studio.
  2. In Solution Explorer, right-click the project → Properties.
  3. Open the Build tab.
  4. Click Advanced… (bottom of the page).
  5. Find Language version.
  6. Select the desired version.
    • default
    • latest
    • preview
    • Or, specific versions like 13.0, 12.0, 11.0, etc.
  7. Save and rebuild.

Method 2: Edit .csproj directly (in SDK-style projects)
Right-click project → Edit Project File and add:
<PropertyGroup>
    <LangVersion>13.0</LangVersion>
</PropertyGroup>

Examples:
<Project Sdk="Microsoft.NET.Sdk">

<PropertyGroup>
   <TargetFramework>net9.0</TargetFramework>
   <LangVersion>13.0</LangVersion>
</PropertyGroup>

</Project>
Save → rebuild.

Method 3: Change for all projects using Directory.Build.props
Create a file named: Directory.Build.props
Add:
<Project>
    <PropertyGroup>
    <LangVersion>13.0</LangVersion>
    </PropertyGroup>
</Project>

This applies to all projects under that folder.

Saturday, June 13, 2026

How to consolidate CSV files

If there are a number of CSV files that have the same data structure, they can be consolidated using a CMD command. If all CSV files have identical headers, combining them into a single CSV file is very easy.

Steps

  1. Put all your CSV files into one folder.
  2. Open cmd.exe in that folder:
    • Open the folder in File Explorer.
    • Click the address bar.
    • Type cmd and press Enter.
    • A Command Prompt window will open in that folder.
  3. Type the following command and press Enter:

copy *.csv Combined.csv

This command merges all CSV files in the current folder into a file named Combined.csv.

Important Note

If every CSV file contains the same header row, the above command will also copy the headers repeatedly. To keep only one header row:

  • Create the combined file using the first CSV file.
  • Append the remaining files without headers, or remove duplicate header rows afterward using Excel, Power Query, or a script.

Example:

Files:

Sales1.csv

Sales2.csv

Sales3.csv

Command:

copy *.csv AllSales.csv

Result:

AllSales.csv

You can open the consolidated CSV file in Excel or any text editor to verify the merged data.

Sunday, May 31, 2026

Batch Program - Move files of specific type to Target folder using BAT file

Using the following Batch programming code, you can Move files of specific type to a target folder. 
  • SET command is used to declare variable and initialize it.
  • If Target folder is missing then MD command creates the target folder.
  • CD command is is used to change directory from D Drive to G:\PowerPoint Y25 folder.
  • The FOR loop loops all MP4 files in the source folder and 
  • DO command uses a number of actions inside its parentheses ().
  • %%i is loop variable which scope is inside the loop.
  • %%nxi stands for filename with extension for each i i.e. mp4 type file.
  • MOVE command is used to move from source to target folder.
  • REM stands for comments in batch code.
  • ECHO command prints the text on console.
@ECHO OFF

SET "SourceDir=G:\PowerPoint Y25"
SET "DestinationDir=G:\Lesson4"
SET "SearchTerm=React"

REM --- 1. Ensure the destination directory exists ---
IF NOT EXIST "%DestinationDir%\" MD "%DestinationDir%"

REM --- 2. Change to the source directory for the search ---
CD /D "%SourceDir%"

REM --- 3. Loop through all PDF files and check the filename ---
FOR %%i IN (*.mp4) DO (
    ECHO Checking: "%%~nxi"
    
    REM Note: Removed the /I switch for case-sensitivity
    ECHO "%%~nxi" | FIND "%SearchTerm%" >NUL
    
    REM This checks: IF the error level is NOT greater than or equal to 1
    REM i.e., IF error level is exactly 0 (Match Found)
    IF NOT ERRORLEVEL 1 (
        ECHO **MATCH FOUND! Moving file: "%%~nxi"**
        
        REM Move the file to the destination folder
        MOVE "%%i" "%DestinationDir%"
    ) ELSE (
        ECHO No match found.
    )
)

PAUSE

Saturday, May 30, 2026

Batch Program - Create Multiple files using BAT command

You can Create 1oo Text files with file extension js, each filename begins with exercise word followed by a nuber, using following BAT command:
@echo off
    FOR /L %%i IN (1,1,99) DO (
        echo This is loop iteration %%i
         type nul > exercise%%i.js
    )
    pause
The following BAT command creates a blank text file named exercise.txt:
@echo off
type nul > exercise.txt

Thursday, November 6, 2025

Batch Program - The SET statement in Batch Script and Loop Variable

Some Facts:

  • The set statement is used to declare and initialize a variable.
  • The variable initialization inside quote is considered best practice.
  • The replaceable parameter is prefixed with % on command line window or %% in batch file. 
  • Note that % is not both side of replaceable parameter as we do with variables declared with set statement.
  • The replaceable parameters are part of loop implicit varibles.
  • The SET statement is used to declare and initialize variable explicitly.
  • The loop variable is implicitly declared.
  • The SET variable can be of more than one letter but loop variable must be of single letter.

@echo off

set x=1222
set "y=234"
set "z=ajeet"
set "myVariable=Ram Krishna"

echo %x% %y% %z% %myVariable%

REM FOR /L implies for loop for a set of numbers
REM (1,3,44) implies (start,step,end) i.e. number between 1 and 44 and step value is 3
FOR /l %%n in (1,3,44) DO (echo %%n)

pause

Batch Program - GOTO Statement in Batch Scripting for infinite loop

The built-in %RANDOM% environment variable and GOTO statement can be used for infinite loop.

@echo off
mode 400
color 03

:label
echo %random% %random% %random% %random% %random% %random% %random% %random% %random% %random% %random% %random%
goto label

pause


Type GOTO/? in CMD window for more information as I have done:

C:\Users\ajeet> GOTO/?

Directs cmd.exe to a labeled line in a batch program.

GOTO label

The label specifies a text string used in the batch program as a label.  You type a label on a line by itself, beginning with a colon.  If Command Extensions are enabled GOTO changes as follows:  GOTO command now accepts a target label of :EOF which transfers control to the end of the current batch script file.  This is an easy way to exit a batch script file without defining a label.  Type CALL /?  for a description of extensions to the CALL command that make this feature useful.


Batch Program - Different File Modifiers in Windows Batch Scripting

File Modifiers are used with replacement parameter in FOR loop. They begin with ~ tilde sign which is followed by replacement parameter(also called loop variable) which can be of 1 letter.

You can run following examples individually to learn about file modifiers.

SYNTAX: %%Tilde Then Single Letter File Modifier Then Single Letter Loop Variable
Note that you can combine file modifiers also.

Example

@echo off

REM List filename of each batch file, file modifier is not used here

FOR %%f in (*.bat) DO echo %%f

pause

Example

@echo off

REM List filename without extension of each batch file, ~n for filename

FOR %%f in (*.bat) DO echo %%~nf

pause

Example

@echo off

REM List file extension of each file, ~x for file extension

FOR %%f in (*) DO echo %%~xf

pause

Example

@echo off

REM List file name with extension of each file, ~nx for file name and extension

FOR %%f in (*.bat) DO echo %%~nxf

pause

Example

@echo off

REM List full path of each file, ~f for fully qualified path including filename

FOR %%f in (*.bat) DO echo %%~ff

pause

Example

@echo off

REM List full path of each file, ~f for fully qualified path excluding filename

FOR %%f in (*.bat) DO echo %%~pf

pause

Example: This example shows the usage in one script.

@echo off
SET "tab= "

ECHO Get list of files 
for %%i in (*) do (
 echo %tab% %%i
)


ECHO Get list of files with fullpath
for %%i in (*) do (
 echo %tab% %%~fi
)

ECHO Get list of files with name only
@echo off
for %%i in (*) do (
 echo %tab% %%~ni
)

ECHO Get list of files with extension only
@echo off
for %%i in (*) do (
 echo %tab% %%~xi
)

ECHO Get list of files with name and extension only
@echo off
for %%i in (*) do (
 echo %tab% %%~nxi
)

ECHO Get list of files with path
@echo off
for %%i in (*) do (
 echo %tab% %%~pi
)


The output of this script is as follows:
Get list of files
         file.txt
         file2.txt
         file_info.bat
Get list of files with fullpath
         D:\BAT Examples\New folder\file.txt
         D:\BAT Examples\New folder\file2.txt
         D:\BAT Examples\New folder\file_info.bat
Get list of files with name only
         file
         file2
         file_info
Get list of files with extension only
         .txt
         .txt
         .bat
Get list of files with name and extension only
         file.txt
         file2.txt
         file_info.bat
Get list of files with path
         \BAT Examples\New folder\
         \BAT Examples\New folder\
         \BAT Examples\New folder\
Press any key to continue . . .

Tips: To get the complete list of file modifier, run the command FOR/?

Here is some list:

    %~I         

 expands %I removing any surrounding quotes (")

    %~fI        

 expands %I to a fully qualified path name

    %~dI       

 expands %I to a drive letter only

    %~pI       

 expands %I to a path only

    %~nI       

 expands %I to a file name only

    %~xI       

 expands %I to a file extension only

    %~sI        

 expanded path contains short names only

    %~aI       

 expands %I to file attributes of file

    %~tI        

 expands %I to date/time of file

    %~zI       

 expands %I to size of file


Batch Program - Positional Arguments in Windows Batch Scripting

We can run a batch file either of the following ways:
  1. By mouse click of the batch file
  2. By running the batch file on CMD prompt.
In the second case, we can easily pass arguments to the command.

Look at the following Batch Script file args.bat:

@echo off
echo First argument is %1
echo 2nd argument is %2
echo 3rd argument is %3
pause

We can pass three arguments when running the batch script file. Look at the image below:

Now run the following command in CMD window: SHIFT/? We get the following help:
C:\Users\ajeet>shift/?
Changes the position of replaceable parameters in a batch file.

SHIFT [/n]

If Command Extensions are enabled the SHIFT command supports the /n switch which tells the command to start shifting at the nth argument, where n may be between zero and eight.  For example: SHIFT /2 would shift %3 to %2, %4 to %3, etc. and leave %0 and %1 unaffected.

The SHIFT command is used shift the arguments. The SHIFT command moves the arguments down, essentially discarding the first one (%1) and moving the second one (%2) into the %1 position, the third (%3) into %2, and so on. This is extremely useful for looping through an unknown number of arguments. Look at the following example file args2.bat in this regard:

@echo off
echo First argument is %1
shift
echo 2nd argument is %1
shift
echo 3rd argument is %1
pause

Look at the result when we run the bat file with arguments:


Batch Program - Get Input From User In Windows Batch Scripting and Do Arithmetic

In the post, we will see how to get input from user in windows batch scripting and do arithmetic operation.
The SET statement provides /P switch which is used to get input on prompt.

Look at the following script to see how user is prompted to input two numbers.
The sum result is displayed thereafter.

@echo off
SET /P x=Enter value of x: 
SET /P y=Enter value of y: 
set /A z=%x%+%y%
echo The sum of x=%x% and y=%y% is %z%
pause

Tips:

  • Give extra space after colon(:)
  • The /A switch is used to write arithmetic expression. When /A is followed by expression then that expression is evaluated as arithmetic operation. Look at the following script in this regard:

@echo off


set i=1
for %%f in (*) do (
@echo %i% %%~nf
set /a i+=1
)
endlocal
@pause

NOTE:
  1. The += is a compound operator used in  i+=1 which is an arithmetic expression. Since variable is reinitialized in each iteration, simple SET statement will not be enough. We use /A switch to imply that i+=1 is an arithmetic expression.
  2. Here, wildcard (*) and (*.*) have subtle difference. The *.* implies to loop through all files and folders which contain a period symbol in their names. But * is just any file or folder.


Batch Program - Prefix all subfolders in a folder using Windows Batch Scripting

The following batch script shows how to prefixes all folders with "Java_".

@echo off
set "prefix=Java_"

REM The /D switch iterates over directory names only.
REM The * wildcard matches all folders.
FOR /D %%i in (*) DO (
    echo "%prefix%%%i"
)

@pause

To really prefix all subfolders of the folder, use REN instead of ECHO command with following minor change:

@echo off
set "prefix=Java_"

REM The /D switch iterates over directory names only.
REM The * wildcard matches all folders.
FOR /D %%i in (*) DO (
    REN "%%i " "%prefix%%%i"
)

@pause

Tips

  • REN command is used to rename file or folder. For more details run the command REN/?

Batch Program - Create Any Number of Folders using Windows Batch Scripting

Run the following code to create 5 folders:


My folder1

My folder2

My folder3

My folder4

My folder5


@echo off

set "foldername=My folder"

set "count=5"


REM Replacement parameter is prefixed with %% in script file

REM The set variables are expanded using % symbol sandwitching them


FOR /L %%i in (1,1,%count%) DO (

MKDIR "%foldername%%%i"


)

pause


Tips

  • You can test the script using ECHO in place of MKDIR. This will show the result in the window.
  • You can change the foldername and count as per the need.
  • To List only folders, use the following switch

D:\BAT Examples\>dir/b/A:D
My folder1
My folder2
My folder3
My folder4
My folder5 


Wednesday, November 5, 2025

Batch Program - Conditionally Remove Prefix from each file using Windows Batch Scripting

The following script removes prefix "New book " from each file. Only those files are processed which have "New book " as leading text.


@echo off

set "prefix=New book "

set "prefix_length=9"

for %%i in ("%prefix%*.txt") do (

set "filename=%%i"

setlocal enabledelayedexpansion

ren "!filename!" "!filename:~%prefix_length%!"

endlocal

)

@pause


Script Explained

  • The script loops through all text files which have prefix New book with single trailing space. The total count of this prefix is 9.
  • Use FOR loop to loop though all such files.
  • Store filename in a temporary variable named filename.
  • Note that %%i represents replacable parameter of FOR loop.
  • At compile time all the commands used inside () are expanded. In other words, strings are expanded by replacing the varibles by their values. For example, "%prefix%*.txt" is replaced as "New book *.txt". Note that * is dynalically replaced by some filename during iteration. Same happens with ren command. It is expanded as ren "!filename!" "!filename:~9!" 
  • At runtime, the filename variable is replaced by current filename in each iteration of loop. The exclamation sign represents the string expansion at runtime while percent sign represents the string expansion at compile time. Note that expansion of variable happens that is sandwitched between exclamation sign or percent sign. The %% sign is replacable parameter of FOR loop variable. It is not for expansion of set variables.

Tips

  • Before running the script, replace ren by echo. It will help you to see the final output on screen without actual result. You can test by the following script:

@echo off

set "prefix=New book "

set "prefix_length=9"

for %%i in ("%prefix%*.txt") do (

set "filename=%%i"

setlocal enabledelayedexpansion

echo "!filename!" "!filename:~%prefix_length%!"

endlocal

)

@pause

Friday, July 18, 2025

Window command to copy all text files with their names as titles

The  >copy *.txt windows command at CMD prompt copies all text files but If you want to also copy each filename before copying each file.then how to do this, is explained in this post.

To copy all .txt files and also record each filename before copying its contents into a.txt, you can use a for loop in the Command Prompt (cmd.exe). Here's a command that does exactly that:

(for %f in (*.txt) do @echo === %f === & type "%f") > a.txt

Explanation:

  • for %f in (*.txt) – loops through all .txt files in the current directory.
  • @echo === %f === – writes the filename (surrounded by markers for clarity).
  • type "%f" – writes the contents of the file.
  • > redirects the entire output into a.txt.

Output Example (a.txt will look like this):

=== file1.txt ===

This is content of file1

=== file2.txt ===

This is content of file2

Note: If you are running this inside a batch file (.bat):

You must double the % signs:

(for %%f in (*.txt) do @echo === %%f === & type "%%f") > a.txt


Sunday, July 6, 2025

Batch Program - BAT file to extract all zipped files from a source folder to target folder

In a folder there are many zipped files at Source Path = C:\Users\ajeet\Desktop\Sources_zips. If you want to extract all zip files in one go then you can use BAT file.
@echo off
setlocal

set "ZIPFOLDER=C:\Users\ajeet\Desktop\Sources_zips"
set "DESTFOLDER=%ZIPFOLDER%\Extracted"

if not exist "%DESTFOLDER%" (
    mkdir "%DESTFOLDER%"
)

for %%I in ("%ZIPFOLDER%\*.zip") do (
    "C:\Program Files\7-Zip\7z.exe" x "%%I" -o"%DESTFOLDER%\%%~nI" -y
)

echo All files extracted.
pause


Tuesday, June 24, 2025

FFmpeg Tips for Audio and Video

You can easily divide or cut an MP4 video based on timelines using FFmpeg. FFmpeg is a powerful command-line tool for handling multimedia files.

Here’s how to do both of your cases:

Before You Start:

·         Install FFmpeg: If you don’t have FFmpeg installed, you’ll need to do that first. You can find instructions for your operating system on the official FFmpeg website or by searching online (e.g., “install ffmpeg windows,” “install ffmpeg mac,” “install ffmpeg ubuntu”).

·         Understand Timestamps: FFmpeg uses timestamps in HH:MM:SS or SS (seconds) format. For example, 00:01:30 is 1 minute and 30 seconds, and 90 is also 1 minute and 30 seconds.


Case 1: Divide into two parts at a point of time

Let’s say you want to split a video input.mp4 at 00:05:00 (5 minutes) into two files: part1.mp4 and part2.mp4.

Command for Part 1 (from beginning to the split point):

ffmpeg -i input.mp4 -ss 00:00:00 -to 00:05:00 -c copy part1.mp4

  • ·         -i input.mp4: Specifies your input video file.
  • ·         -ss 00:00:00: Starts the extraction from the beginning of the video. (You can omit this if you want to start from the very beginning, but it’s good for clarity).
  • ·         -to 00:05:00: Specifies the end point of the extraction. The video will be cut up to this timestamp.
  • ·         -c copy: This is crucial! It tells FFmpeg to copy the video and audio streams directly without re-encoding them. This makes the process extremely fast and avoids any quality loss.

Command for Part 2 (from the split point to the end):

ffmpeg -i input.mp4 -ss 00:05:00 -c copy part2.mp4

  • ·         -i input.mp4: Specifies your input video file.
  • ·         -ss 00:05:00: Specifies the start point of the extraction. The video will be cut from this timestamp.
  • ·         -c copy: Again, use copy to avoid re-encoding.

Example for a specific point in time (e.g., 1 minute 30 seconds):

ffmpeg -i your_video.mp4 -ss 00:00:00 -to 00:01:30 -c copy first_part.mp4

ffmpeg -i your_video.mp4 -ss 00:01:30 -c copy second_part.mp4


Case 2: Get a segment of video given two point of times

Let’s say you want to extract a segment of input.mp4 from 00:01:00 (1 minute) to 00:03:30 (3 minutes 30 seconds) into a new file segment.mp4.

Command:

ffmpeg -i input.mp4 -ss 00:01:00 -to 00:03:30 -c copy segment.mp4

  • ·         -i input.mp4: Specifies your input video file.
  • ·         -ss 00:01:00: Specifies the start point of the segment.
  • ·         -to 00:03:30: Specifies the end point of the segment.
  • ·         -c copy: Uses stream copy for speed and quality preservation.

Alternative using -t (duration) instead of -to (end time):

You can also specify the duration of the segment using -t. The duration is calculated from the -ss (start) point.

To get a 2 minute 30 second segment starting at 00:01:00:

ffmpeg -i input.mp4 -ss 00:01:00 -t 00:02:30 -c copy segment_duration.mp4

  • ·         -t 00:02:30: Specifies the duration of the output segment. (3 minutes 30 seconds - 1 minute = 2 minutes 30 seconds).


Important Considerations:

·         Keyframes: When using -c copy, FFmpeg cuts at the nearest keyframe. This means your cuts might not be exactly at the specified timestamp, but usually very close (within a fraction of a second). If you need frame-accurate cuts, you’ll have to re-encode the video, which will be slower and might result in some quality loss. For most practical purposes, -c copy is sufficient and highly recommended.

·         Re-encoding for Frame-Accurate Cuts (Slower & Quality Loss): If you absolutely need frame-accurate cuts and don’t mind re-encoding (e.g., if you’re doing very precise editing), you would omit -c copy and let FFmpeg re-encode. You might also want to specify output quality settings (e.g., -crf for H.264).

·         ffmpeg -i input.mp4 -ss 00:01:00 -to 00:03:30 output_reencoded.mp4

·         Testing: Always test with a small segment or a copy of your video first to ensure the commands work as expected before processing large or important files.

By using these FFmpeg commands, you can efficiently divide and extract segments from your MP4 videos based on timelines.

M4A to MP3

ffmpeg -i input.m4a -codec:a libmp3lame -qscale:a 2 output.mp3

Sunday, October 27, 2024

Tech Tips, Different ways to extract Audio from Video or convert Video into Audio

You can convert an MP4 or any other type video file into an MP3 or other format audio file  using various methods, including software applications and online converters. Here are given three options:

Using VLC Media Player

  1. Open VLC: Download and install VLC Media Player if you don't have it.
  2. Go to Media: Click on Media in the top menu and select Convert / Save.
  3. Add MP4 File: Click on Add and select the MP4 file you want to convert.
  4. Click Convert / Save: After adding the file, click the Convert / Save button.
  5. Select Profile: In the profile dropdown, choose Audio - MP3.
  6. Choose Destination: Select a destination file by clicking Browse, then enter the desired file name with the .mp3 extension.
  7. Start Conversion: Click Start to begin the conversion process.

Using FFmpeg (Command Line)

If you're comfortable using the command line, you can use FFmpeg:

  1. Install FFmpeg: Download and install FFmpeg from the official website.
  2. Open Command Prompt/Terminal: Navigate to the folder containing your MP4 file.
  3. Run the Command: Use the following command to convert the file:
ffmpeg -i input.mp4 -q:a 0 -map a output.mp3

Replace input.mp4 with the name of your MP4 file and output.mp3 with the desired MP3 file name.

Explained: ffmpeg -i input.mp4 -q:a 0 -map a output.mp3

The command ffmpeg -i input.mp4 -q:a 0 -map a output.mp3 is used to extract the audio from a video file (e.g., input.mp4) and save it as an MP3 file (output.mp3). Here’s a detailed breakdown of each part of the command:

  1. ffmpeg

This is the command-line tool used for processing multimedia files. FFmpeg can convert between different formats, extract audio, merge files, and more.

  1. -i input.mp4

The -i flag specifies the input file. In this case, input.mp4 is the file from which you want to extract the audio.

  1. -q:a 0

This option controls the quality of the audio output:

  • -q:a refers to the audio quality setting.
  • The value 0 represents the highest audio quality available for MP3. Lower numbers (closer to 0) provide better quality, while higher numbers provide lower quality but smaller file sizes.

Note: The -q:a option is specific to codecs that support variable bitrates (VBR), such as MP3. If you wanted to specify a constant bitrate (CBR), you would use -b:a instead (e.g., -b:a 192k for 192 kbps).

  1. -map a

This option tells FFmpeg which streams to include in the output:

  • -map allows you to select specific streams from the input file (e.g., audio, video, subtitles).
  • a refers to the audio stream. In this case, you're telling FFmpeg to only include the audio stream in the output file and ignore the video stream.
  1. output.mp3

This is the name of the output file. The extracted audio will be saved as output.mp3. You can change this to any name and format supported by FFmpeg, but in this case, MP3 is specified.

Summary

  • ffmpeg: The tool used for processing multimedia files.
  • -i input.mp4: Specifies the input file (input.mp4).
  • -q 0: Sets the audio quality for MP3 output (0 = highest quality).
  • -map a: Selects the audio stream from the input file.
  • output.mp3: The name of the output audio file.

This command is extracting only the audio from input.mp4 and saving it as a high-quality MP3 file called output.mp3.

VSDC Video Editor

Yes, you can export audio from your project in VSDC Video Editor as a separate audio file. Here’s how you can do it:

Steps to Export Audio from VSDC

  1. Open Your Project: Launch VSDC Video Editor and open the project from which you want to export audio.
  2. Select the Audio Track: Make sure the audio you want to export is selected in the timeline. If you have multiple audio tracks, ensure you choose the correct one.
  3. Go to the Export Tab: Click on the Export Project tab at the top of the interface.
  4. Choose Audio Format:
    • In the export settings, look for the Audio section.
    • Select the desired audio format for your export (e.g., MP3, WAV, etc.).
  5. Configure Audio Settings: You may have options to configure the audio bitrate, sample rate, and other settings based on your chosen format.
  6. Set Destination: Choose the destination folder where you want to save the exported audio file. You can do this by clicking the folder icon next to the output path field.
  7. Export: Click on the Export Project button (usually found at the bottom of the export settings window) to begin the export process.
  8. Wait for Completion: Once the export is complete, you can find your audio file in the specified location.

This method allows you to save the audio from your video project separately, making it easy to use in other applications or share as needed.

Thursday, May 20, 2021

Google Chrome Shortcuts


  1. To open a new instance of Chrome browser using Run dialog Type chrome and press ENTER.
  2. To find in the page, CTRL+F or CTRL+G
  3. To see the History, CTRL+H
  4. To see the Download, CTRL+J
  5. To search google, CTRL+K
  6. To reach the navigation address bar of Chrome, press CTRL + L
  7. To create a new tab in the Chrome, press CTRL + T
  8. To close the current active Tab, CTRL+W
  9. To activate a Chrome tab number N(from Left to right), press CTRL + N, where N stands for tab number between 1 to 8. For example to activate tab number 2, press CTRL+2
  10. To Zoom in the Chrome page, press CTRL++ repeatedly.
  11. To Zoom out the Chrome page, press CTRL+- repeatedly.
  12. To reset the Zoom, press CTRL+0
  13. To reach the first tab, we press CTRL+1 and to reach the last tab, press CTRL+9
  14. To bookmark the active tab, CTRL+D
  15. To bookmark all the tabs, CTRL+SHIFT+D
  16. To open the bookmark Manager, CTRL+SHIFT+O
  17. To toggle the bookmarks bar, which appears below address bar, press CTRL+SHIFT+B
  18. To open the window in the incognito mode, press CTRL+SHIFT+N
  19. To move from one tab to next tab, press CTRL+TAB (from Left to right tab) or CTRL+SHIFT+TAB (from Right to Left tab)
  20. To observe the Source code of the page, press CTRL+U
  21. To move to the Previous page, ALT + Left Arrow
  22. To move to the Forward page, ALT + Right Arrow
  23. To toggle Full Screen Mode, F11
  24. To toggle, the Inspect, press CTRL+SHIFT+I

  25. To toggle the Developer Mode, F12
  26. To clear the browsing data, CTRL+SHIFT+DELETE 

  27. We can find the shortcut hints in the Menu items, by clicking vertical three-dots, or ALT+E 
  28. We can do a lot more by clicking the Settings. For example, we can change the default download location
  29. We can change the default Search Engine. The snapshots of Search Engine settings is below.

  30. Chrome has its Task Manager which can be opened by pressing SHIFT+ESC

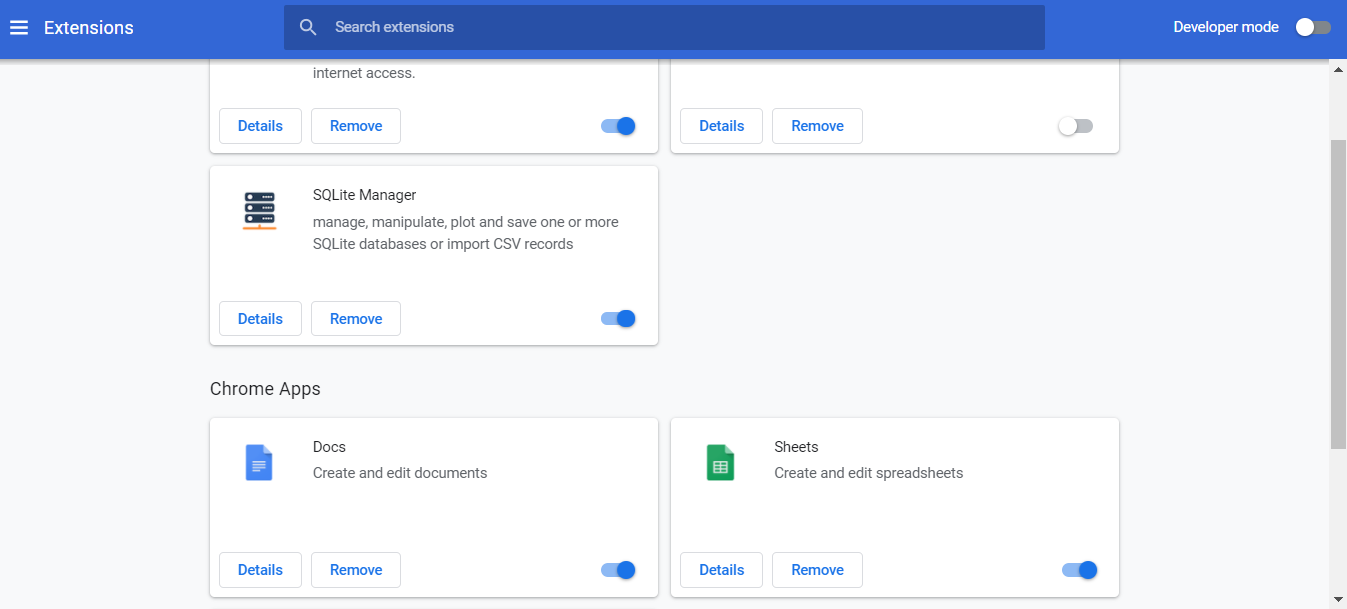
  31. We can remove unwanted Extensions, if the Chrome speed is affected. We can also enable the Developer Mode as shown below

  32. To refresh the page, F5


Wednesday, May 19, 2021

Visual Studio Code Editor Tips

The Visual Studio Code Editor is a highly sophisticated editor which includes a lot of valuable features. The editor has correspondingly a number of shortcuts. When we open the Visual Studio Code Editor, some routinely used shortcuts are shown as shown below.

To learn about VS Code, we should use it more and more and help is not far away. The Help menu contents different Menu Items which is depicted below and Getting Started with VS Code is valuable for the beginners.


The following points are about the elementary tips and tricks to get started with the Visual Studio Code Editor. 
  1. We can run Visual Studio Editor using code command at CMD. It is shown below.

  2. We can run VS Code just by typing code in Run dialog box.

  3. We can find all the commands of the Visual Studio Code Editor version by executing the command code --help

  4. We can check the Visual Studio Code Editor version by executing the command code --version
  5. We can open a new window in Visual Studio Code Editor by executing the command code -n
  6. We can open a file or folder in an already opened window by executing the command code -r
  7. We can list the extensions installed in the Visual Studio Code Editor by executing the command code --list-extensions --show versions

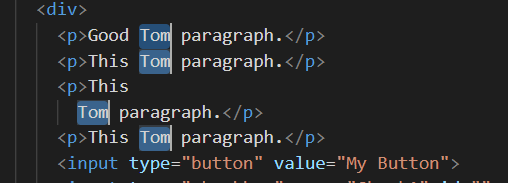
  8. We can select a specific text by pressing CTRL+SHIFT, followed by right or left arrow. It will select the text and will highlight all the matching texts. Now to create cursors at the end of these matching texts, We can use following shortcuts. Either press CTRL+D repeatedly to create cursors at the end of these matching texts one by one. To create cursors at the end of all the matching texts in one go, we can press CTRL+ SHIFT+ L. or CTRL+F2. Now we can edit the matching texts simultaneously. To remove the multiple blinking cursors, press ESC button.

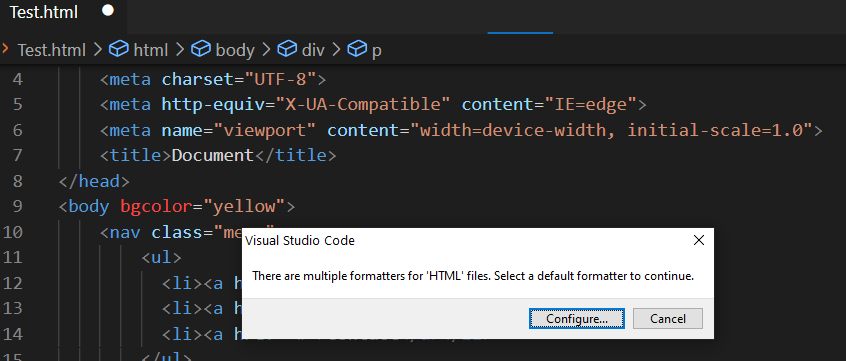
  9. To correct the formatting of the document, we can press ALT+SHIFT+F. But if multiple extensions are installed to format the document, the VS Code will prompt to select one of them as shown below.

  10. To move a line of code or block of codes, we can use ALT + Up/Down Arrow. The ALT+ Up will move the code upward from its current position.
  11. To show or hide the sidebar, press CTRL+B. This will toggle the show/hide of sidebar.

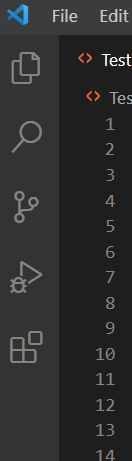
  12. To activate any sidebar items, we can use the following shortcuts.
    1. CTRL+SHIFT+D: To activate the Debug

    2. CTRL+SHIFT+E: To activate the Explorer

    3. CTRL+SHIFT+F: To activate the Search

    4. CTRL+SHIFT+G: To activate the GIT Source control

    5. CTRL+SHIFT+X: To activate the Extension pane 

  13. Command Pallet is an important feature of VS Code editor, To open the Command Pallet, we press CTRL+P. The Command Pallet is used to write command and execute it. To go to a line, write colon(:) followed by the line number. For example, :12 will move the cursor to line number 12.

  14. By pressing CTRL+G in the Command Pallet, we can get the information of the current line.

  15. We can see all the commands usable in the Command Pallet by typing >. We don't have to memorize the commands. The greater-than > symbols shows the list of all the useful commands.

  16. IntelliSense is an important feature of any good editor. The VS Code editor IntelliSense shows all the possible tags in HTML when used with HTML file. This goes with all types of files as well.
  17. The Emmet Plugin enhances the utility of the VS Code immensely.  We can type a lot of HTML codes just by using a few words and IntelliSense.
  18. Just type Exclamation ! and hit ENTER button. The basic HTML structure code will be printed.

  19. Type html and the Intellisense will pop down the relevant tags.

  20. Typing or selecting html:5 followed by ENTER/TAB will produce the HTML5 basic structure code as depicted below. 

  21.  Usually the tag followed by colon symbol has symbol for attribute type or its value. For example, in the following image, input:b Here, b stands for type attribute value equal to button.

  22. To add link tag for using CSS, we type link: CSS. This will result into the following code. <link rel="stylesheet" href="style.css">Note the below image. 

  23. To add a script file like JavaScript, we type script: src which gives <script src=""></script>
  24. The comment in the Visual Studio Code, the shortcut is CTRL + /
  25. The following code comments are shortcuts for the their below codes.
  26. <body>
      <!-- input:b -->
      <input type="button" value=""> 
      <!-- input:c -->
      <input type="checkbox" name="" id="">
      <!-- input:f -->
      <input type="file" name="" id="">
      
    </body>
  27. To add some random text into the page, type lorem and press tab. To give some texts into the paragraph tag, we can type like p*2>lorem This will create two paragraph tags with some random lorem contents. Another example can be div*3>lorem. The general syntax can be tagname*N>lorem followed by TAB character. This is shown below.  <pLorem, ipsum dolor sit amet consectetur adipisicing elit. Aliquid commodity</p>
    <p>luptatum aliquid repellat excepturi. Nobis adipisci fuga voluptatem?</p>
  28. To delete a line, CTRL+X or CTRL+SHIFT+K.
  29. To fold a group of lines of codes, CTRL+SHIFT+[
  30. To unfold a group of lines of codes, CTRL+SHIFT+]
  31. To zoom in the editor, CTRL+ +
  32. To zoom out the editor, CTRL+ -
  33. More points will be added and this page will be updated.

Hot Topics