Assembly:
According to Microsoft site, Assemblies form the fundamental units of deployment, version control, reuse, activation scoping, and security permissions for .NET-based applications. An assembly is a collection of types and resources that are built to work together and form a logical unit of functionality. Assemblies take the form of executable .exe) or dynamic link library (.dll) files, and are the building blocks of .NET applications. They provide the common language runtime with the information it needs to be aware of type implementations. In .NET Core and .NET Framework, you can build an assembly from one or more source code files. In .NET Framework, assemblies can contain one or more modules. This allows larger projects to be planned so that several developers can work on separate source code files or modules, which are combined to create a single assembly. There are two types of Assembly files in C#. They are DLL Assembly file
EXE Assembly file
A DLL assembly file is created when Class Library template is used in the .NET project and the project is compiled. And, an EXE assembly file is created when an executable application is compiled. An executable application has an entry point method called Main in the .NET projects.
When a C# project is compiled, assembly(exe or dll file) is created. The assembly file is created inside bin/debug folder after compilation of the project in the debug mode. If the project is compiled in the release mode, the assembly file is created inside the bin/release folder.
How to Create DLL Dynamic Link Library
Open Visual Studio and Create a new project. There are different kinds of templates available in the Visual Studio to create different kinds of projects. To create a DLL, we use Class Library template. So, we have to select Class Library(.NET Framework) as the template of the project. Class Library project creates DLL file. The Main method is not found in such project. Remember that the Main method is found in case of Application project (Windows Application and Console Application). Looking at the project properties, we can know whether it is Application project or not.
Therefore, Step1. Select Class Library(.NET Framework) template.
Step2. Name the project (for example, ClassLibraryDLL) and set its location.
Step3. We get a default class named Class1 inside the ClassLibraryDLL namespace. It will be as follows:
namespace ClassLibraryDLL
{
    public class Class1
    {
    }
}
Right click in the Solution Explorer and click 'Open Folder in File Explorer'. We reach at the Project folder.
Look into the bin/debug folder. We find it empty because no file is generated before compiling the files. Before compilation, assembly is not created. We can verify it. Inside the bin/Debug folder, no assembly file is created before compilation of the project.
Now rename the class as TextSplitter and add a method named GetSplittedTexts in it as follows.
using System;
namespace ClassLibraryDLL
{
    public class TextSplitter
    {
        public void GetSplittedTexts(string text)
        {
            string[] str = text.Split(' ');
            foreach (var s in str)
            {
                Console.WriteLine(s);
            }
                Console.ReadKey();
        }
    }
}
A DLL file or Class Library project contains reusable methods inside the class.
When the project is compiled, .DLL file is created. The name of the DLL file is that of the project name. A DLL can contain one or more classes. This is depicted below. DLL file is generated after compilation of the project. Press CTRL+SHIFT+B to compile.
Unlike EXE file, we cannot run a DLL file by clicking it or by any other way. In fact, a DLL file contains business logic which can be used by any application by referencing the DLL. An instance of the class of the assembly file is created to access the member methods of the assembly. The member methods implements the business logic which is otherwise hidden in the application where the assembly is used. If we try to run the DLL file, we get following message.
How to use DLL
The DLL file is created in the above class library project. Now, the question is how to use it in any project. First, we look at some facts of DLL before learning about how to use a DLL file.
The Microsoft .NET project uses a number of class files of the .NET Framework. These class files are basically the DLL files. The using statements are used to refer them.
These DLL files are inside the C:\Windows\assembly folder.
We can find them at the location Windows/Microsoft.NET/Assembly/GAC_MSIL/
GAC stands for Global Assembly Cache and MSIL stands for Microsoft Intermediate Language.
We can use our own created private DLL. For example, we have created a DLL file in ClassLibraryDLL project. To use it, we have to provide reference in the project where it is going to be used.
Create a project named ConsoleDLL with Main method. For example, a console application using the .NET Framework as shown below will create a class with Main method.
The class will be with Main method as follows.
class Program
    {
        static void Main(string[] args)
        {
        }
    }
We edit the code as follows.
using ClassLibraryDLL;
namespace ConsoleDLL
{
    class Program
    {
        static void Main(string[] args)
        {

        }
    }
}
Note that we use ClassLibraryDLL in the using statement to use the DLL file created in the previous project in the current project. Also, we need to provide the reference of the DLL using Reference Manager.
To add the reference, right click the References in the Solution Explorer as depicted below.
The Reference Manager dialog box will come up. Click the Browse button.
Select the ClassLibraryDLL.dll file from its location. Click the Add button.
Now the ClassLibraryDLL will appear in the Solution Explorer.
Now, we are ready to use the members of the DLL in the current project. We have to create an instance of the class of the DLL to access its members(methods and fields). This is shown in the following code.
using ClassLibraryDLL;
namespace ConsoleDLL
{
    class Program
    {
        static void Main(string[] args)
        {
            string quote = "Life before text and text before commentary";
            TextSplitter splitter = new TextSplitter();
            splitter.GetSplittedTexts(quote); //method of the referenced DLL
        }
    }
}
The details of a project can be obtained by looking at the Properties of project. Right click ALT+ENTER to open the Properties windows.
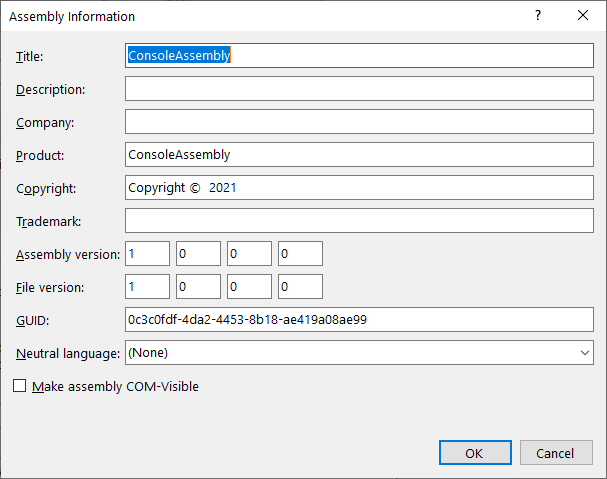
From the above snapshot, it is obvious that an assembly is created to target a particular version of .NET Framework and the Output type of the assembly can be Class Library or Console Application or Windows Application. Additional information about the assembly can be obtained by clicking Assembly Information..., the Assemby Information dialog box appears. It shows the GUID of assembly, file version etc.
The same information can be viewed by looking at the AssembyInfo.cs file.
AssemblyInfo
Note that the information about the assembly file can be inspected in the AssemblyInfo.cs file existing in the Solution Explorer.
On clicking this file, we get the details of the assembly file.
There are two types of Assembly according to its accessibility to applications.
- Private Assembly
- Shared Assembly
A private Assembly is used by an application and the assembly is not available by default to other applications. After compilation, the reference added in the project is copied in to the bin/debug folder. We can verify it.
We find the ClassLibraryDLL.dll in the main application bin/debug folder.
If we delete the assembly, the EXE will fail to run. It means that the application has dependency with the assembly. It means that a private assembly must be copied to all the applications where it is being used.
On the other hand, a shared assembly is located at GAC (Global Assembly Cache) and can be accessed by any application which require to access it.
ILDASM and ILASM (Disassembler and Assembler)
ILDASM is a tool or EXE file to disassemble an Assembly file. An Assembly contains IL and manifest files. IL stands for Intermediate Language.
We can export the IL and manifest files into a text file.
An assembly contains the business logic. We cannot change the logic of the assembly but we can definitely modify some of its attributes.
Weak Name Assembly and Strong Name Assembly
With the introduction of .NET 4.0, two GAC folders were introduced. The Assembly of .NET4.0 was kept separately in C:/Windows/Microsoft.NET/Assembly/GAC_MSIL/ and older versions assemblies were kept in the C:\Windows\Assembly folder.
An assembly file has attributes like name, version, culture, and public key token.
If the assembly is without public key token, it is called Weak named assembly.
If the assembly is with public key token, it is called Strong named assembly.
The culture attribute of an assembly file implies that the language in which the assembly is built. If the culture information is not given, by default, it is in the English (en) language.
The information about an assembly can be accesses in the Visual Studio by looking at the AssemblyInfo.cs file.
The version of an assembly is divided into four parts. They are
- Major Version
- Minor Version
- Build Number
- Revision
The version of an assembly can be looked in the AssemblyInfo.cs file.
How to convert a weak named assembly into strong named assembly
We have to take following steps to create strong named assembly.
To create a shared assembly i.e. strong named assembly, we have to create a public key token. To generate the token, we have to create a file with extension .snk. The snk stands for strong named key.
If you are using Visual Studio 2019, we open the Visual Studio Command Prompt Windows with administrative rights by searching the Developer Command Prompt.
Now open the VS command prompt and type the command as depicted below.
The file is generated in the destination path. This is depicted below.
Next we have to add the AssesmblyKeyFile attribute to the AssemblyInfo.cs file in the ClassLibraryDLL project. Open this file and add the following code.
[assembly: AssemblyKeyFile("F:\\AnyName.snk")]
Now build the project. After successful built, the assembly is now with public key token. But the assembly is not added to GAC. We have to use gacutil.exe to do this. Open the Visual Studio Command Prompt again as Administrator. Type the following code.
>gacutil.exe -i "C:\Users\AJEET\Desktop\Apple\MvcEx\ClassLibraryDLL\ClassLibraryDLL\bin\Debug\ClassLibraryDLL.dll"
Note that the switch i stands for "install". Press ENTER to execute the command. If the command is successful, message appears. We can verify that the ClassLibraryDLL assembly is installed into the GAC_MSIL folder. Now the ClassLibraryDLL is added into GAC. Note that if you try to install an assembly into GAC without providing the public key token to the assembly in its AssemblyInfo.cs file, error will be thrown.
To uninstall the DLL, we use the switch -u. The full DLL file path is not required to uninstall.
>gacutil.exe -u "ClassLibraryDLL.dll"
Exercise: Now add a new method in the ClassLibraryDLL project file, change the version number in the AssemblyInfo.cs file and rebuild the project. Now, verify the change in the GAC_MSIL folder for the ClassLibraryDLL. We will find that different versions of assembly files are installed inside the GAC folder with same token number. This is called side by side execution of the assembly.
Note that the GAC contains a single copy of the assembly file and it is shared among different applications. This is why GAC installed assembly is called Shared Assembly. The Add Reference and Reference Manager is not used with Shared DLL. The using statement is enough because the compiler CLR directly looks into the GAC folders to find the assembly.
DLL Hell Problem
We know that if we try to copy a file into a folder which contains the same name file, warning appears that the file will be overwritten. Similarly, if two developers develop two assemblies with same name and same version and they install their assembly in the machine one by one, then the earlier installed assembly will be replaced by the later installed assembly. This is known as DLL Hell problem. To prevent this problem, we must use distinct versions for each assembly.


No comments:
Post a Comment