To create MVC Application from the scratch, we follow the following steps.
Step1. Select the ASP.NET Web Application (.NET Framework) and click Next button.
Step2. Give a meaningful name of your project. For example, MvcWebApp.
Step3. Select Empty project template. Don't check mark any options from the "Add folders and core references" and uncheck the "configure for HTTPS". and click "Create"
Step4. The default folders and files appear in the Solution Explorer. If you click the CTRL+F5 or F5, we get the following error.
The error occurs because many important references such as System.Web.Mvc are missing in this application. We will add them one by one as we go ahead.
Explore the files generated
Before that we look at the default files and folders added in the Solution Explorer. We find packages.config and web.config file apart from Properties and References. Expand the References node to see the default added references.
Collapse the node and click the packages.config file and look at its code. It is an XML file. We find the following code.
<?xml version="1.0" encoding="utf-8"?>
<packages>
<package id="Microsoft.CodeDom.Providers.DotNetCompilerPlatform" version="2.0.1" targetFramework="net472" />
</packages>
Similary, click the web.config file and see its code. It is also an XML file.
<?xml version="1.0" encoding="utf-8"?>
<!--
For more information on how to configure your
ASP.NET application, please visit
https://go.microsoft.com/fwlink/?LinkId=169433
-->
<configuration>
<system.web>
<compilation debug="true" targetFramework="4.7.2" />
<httpRuntime targetFramework="4.7.2" />
</system.web>
<system.codedom>
<compilers>
<compiler language="c#;cs;csharp" extension=".cs" type="Microsoft.CodeDom.Providers.DotNetCompilerPlatform.CSharpCodeProvider,
Microsoft.CodeDom.Providers.DotNetCompilerPlatform, Version=2.0.1.0,
Culture=neutral, PublicKeyToken=31bf3856ad364e35" warningLevel="4" compilerOptions="/langversion:default
/nowarn:1659;1699;1701" />
<compiler language="vb;vbs;visualbasic;vbscript" extension=".vb" type="Microsoft.CodeDom.Providers.DotNetCompilerPlatform.VBCodeProvider,
Microsoft.CodeDom.Providers.DotNetCompilerPlatform, Version=2.0.1.0,
Culture=neutral, PublicKeyToken=31bf3856ad364e35" warningLevel="4" compilerOptions="/langversion:default
/nowarn:41008 /define:_MYTYPE=\"Web\"
/optionInfer+" />
</compilers>
</system.codedom>
</configuration>
Click the Properties and then click the AssemblyInfo.cs file. We get the following code.
using System.Reflection;
using System.Runtime.CompilerServices;
using System.Runtime.InteropServices;
// General
Information about an assembly is controlled through the following
// set of
attributes. Change these attribute values to modify the information
//
associated with an assembly.
[assembly: AssemblyTitle("MvcWebApp")]
[assembly: AssemblyDescription("")]
[assembly: AssemblyConfiguration("")]
[assembly: AssemblyCompany("")]
[assembly: AssemblyProduct("MvcWebApp")]
[assembly: AssemblyCopyright("Copyright
© 2021")]
[assembly: AssemblyTrademark("")]
[assembly: AssemblyCulture("")]
// Setting
ComVisible to false makes the types in this assembly not visible
// to COM
components. If you need to access a type
in this assembly from
// COM, set
the ComVisible attribute to true on that type.
[assembly: ComVisible(false)]
// The
following GUID is for the ID of the typelib if this project is exposed to COM
[assembly: Guid("2e2e0dd4-d4d3-47d6-b9de-8b994bce20f8")]
// Version
information for an assembly consists of the following four values:
//
// Major Version
// Minor Version
// Build Number
// Revision
//
// You can
specify all the values or you can default the Revision and Build Numbers
// by using
the '*' as shown below:
[assembly: AssemblyVersion("1.0.0.0")]
[assembly: AssemblyFileVersion("1.0.0.0")]
Adding the Reference of System.Web.Mvc
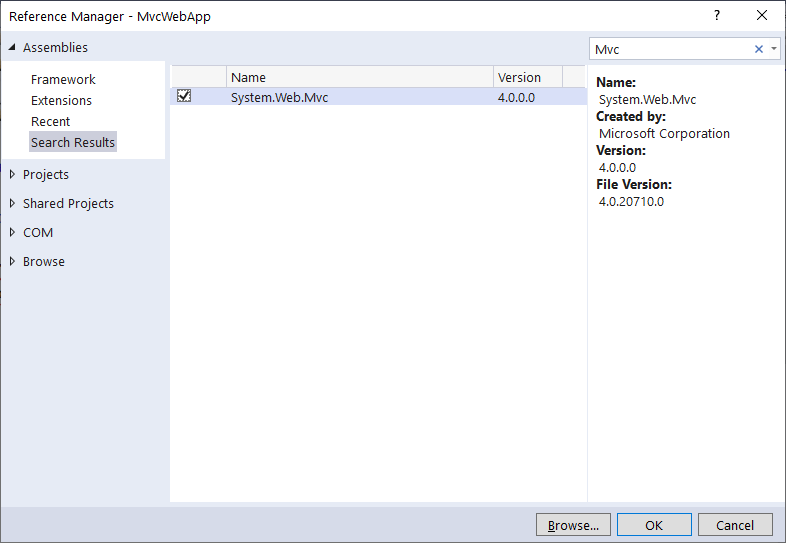
Step5. We add the reference of System.Web.Mvc. It is required to develop MVC application. Right click the References node and click Add References.
Then click the Assemblies node the LHS. Expand it and select Framework. Press CTRL +E to reach the search box and type Mvc and then we find the System.Web.Mvc. Select it and click OK. We find the System.Web.Mvc added in the References.
Next we need the RouteConfig class and Global.asax files to set the routing in the MVC application. Without them, application will not work. Both files are interrelated.
Step6. Now we add "App_Start" folder in the project.
Step7. We add the RouteConfig class file inside the App_Start folder.
Step8. We add the following code in the RouteConfig class. We add RegisterRoutes method in this class. The code is as follows.
using System.Web.Mvc;
using System.Web.Routing;
namespace MvcWebApp.App_Start
{
public class RouteConfig
{
public static void RegisterRoutes(RouteCollection routes)
{
routes.IgnoreRoute("{resource}.axd/{*pathInfo}");
routes.MapRoute
(
name: "default",
url: "{controller}/{action}/{id}",
defaults: new
{
controller = "Home",
action = "Index",
id = UrlParameter.Optional
}
);
}
}
}
NOTES
- The MapRoute has three named parameters: name, url and defaults.
- The RouteCollection belongs to System.Web.Routing namespace.
- The IgnoreRoute and MapRoute methods belongs to System.Web.Mvc.
Step9. We add Global.asax file. Press CTRL+SHIFT+A and then CTRL+E to reach inside the search box. Type global and press ENTER. We get the Global Application class file. Select it and click Add button.
Step10. Now we get the Global.asax file in the Solution Explorer and it contains Global.asax.cs file. The default code in the Global.asax.cs file is as follows.
using System;
using System.Collections.Generic;
using System.Linq;
using System.Web;
using System.Web.Security;
using System.Web.SessionState;
namespace MvcWebApp
{
public class Global : System.Web.HttpApplication
{
protected void Application_Start(object sender, EventArgs e){}
protected void Session_Start(object sender, EventArgs e){}
protected void Application_BeginRequest(object sender,
EventArgs e){}
protected void Application_AuthenticateRequest(object sender,
EventArgs e){}
protected void Application_Error(object sender, EventArgs e){}
protected void Session_End(object sender, EventArgs e){}
protected void Application_End(object sender, EventArgs e){}
}
}
CTRL+M,O and collapse all codes in the Global.asax.
We need to modify the Global.asax and Global.asax.cs files. We modifiy the Global.asax.cs file code. Now it looks as follows.
using MvcWebApp.App_Start;
using System.Web.Mvc;
using System.Web.Routing;
namespace MvcWebApp
{
public class MvcApplication : System.Web.HttpApplication
{
protected void Application_Start()
{
AreaRegistration.RegisterAllAreas();
RouteConfig.RegisterRoutes(RouteTable.Routes);
}
}
}
EDITING THE GLOBAL FILES
NOTE: We renamed the class Global to MvcApplication in the above code. This class name is referenced in the Global.asax file as well. We have to edit it there as well.
Select the project in the Solution Explorer and right click and the select "Open Folder in File Explorer". We reach inside the project folder. We find the Global.asax and Global.asax.cs files there. Right click Global.asax and open it in Notepad or Notepad++. Next, we have to edit it.
We change inherits = "MvcWebApp.Global" to inherits = "MvcWebApp.MvcApplication". Save the file and close it.
Step11. Rebuild the Application using CTRL+SHIFT+B.
ADDING CONTROLLER AND VIEW FILES WITHOUT SCAFFOLDING
Step12. We have added the logic of routing in the RouteConfig and Global.asax and Global.asax.cs files. Now we will add the Controllers folder and Views folder in the project.
We add a HomeController.cs class file in the Controller folder. It is a normal simple class, not controller class.
The default code is as follows:
namespace MvcWebApp.Controllers
{
public class HomeController
{
}
}
We need to inherit the Controller class in HomeController class so that HomeController inherits all properties and methods of Controller class. Then, the HomeController class becomes a controller class.
The modified code is as follows after inheriting the Controller class:
using System.Web.Mvc;
namespace MvcWebApp.Controllers
{
public class HomeController : Controller
{
}
}
REMARK: Controller class is a special class in MVC Framework which must be inherited by any controller class to become a controller.
All the methods in the user's controller class will be public and non-static and will return ActionResult object.
The ActionResult class is an abstract class which derived classes such as ViewResult, ContentResult, PartialViewResult, FileResult, JsonResult, JavaScriptResult etc. can be used as an action method return type.
We add an Index method in the HomeController class.
The modified code is as follows
using System.Web.Mvc;
namespace MvcWebApp.Controllers
{
public class HomeController:Controller
{
public ActionResult Index()
{
return View();
}
}
}
MVC Convention
As the above method returns a view. The View() method returns a view which name will be the name of the action method. It means that the Index named view will be returned by the Index action method of Home controller.
We create Home folder inside the Views folder which is the repository of all views and the Views folder contains subfolders which are named for each controller class used in the Controller folders. And, we add the Index.cshtml file inside the Views/Home folder. Select the Home folder and press CTRL+SHIFT+A. Then, CTRL+E and type razor in the search box. Select the MVC 5 View Page (Razor)
Rename the file as Index.cshtml and click Add button. The Index.cshtml file is added inside the Home folder.
Add the following HTML tags in the view page.
@{
Layout = null;
}
<!DOCTYPE html>
<html>
<head>
<meta name="viewport" content="width=device-width" />
<title></title>
</head>
<body>
<div>
Index Test Page
</div>
</body>
</html>
Rebuild the project by pressing CTRL+SHIFT+B and run the project by pressing CTRL+F5 or F5.
We get the following error.
Exception Details: System.InvalidOperationException: The view at '~/Views/Home/Index.cshtml' must derive from WebViewPage, or WebViewPage<TModel>.
[InvalidOperationException: The view at '~/Views/Home/Index.cshtml' must derive from WebViewPage, or WebViewPage<TModel>.]
Reason of this error?
A razor page i.e. .cshtml file is not simple html file. It contains the C# codes apart from HTML code. The C# codes must be converted into HTML code to render the view as HTML page. So, every view page must inherits the System.Web.Mvc.WebViewPage class which provides the methods and properties to render the page as HTML. We can get some idea by the following Intellisense hints.
So, What is the solution? We must add the following directive in the Index view page at the top of the code.
@inherits System.Web.Mvc.WebViewPage
This will enable the view page to inherit all the methods and properties System.Web.Mvc.WebViewPage class to render the page as HTML.
The Index.cshtml page code becomes as shown below.
@inherits System.Web.Mvc.WebViewPage
@{
Layout = null;
}
<!DOCTYPE html>
<html>
<head>
<meta name="viewport" content="width=device-width" />
<title></title>
</head>
<body>
<div>
Index Test Page
</div>
</body>
</html>
Again, rebuild the project by pressing CTRL+SHIFT+B and run the project by pressing CTRL+F5 or F5. Now, We get the expected view page.
But the problem is, we will have to add the directive @inherits System.Web.Mvc.WebViewPage
in all the view pages.
To solve this problem, we can use the web.config file. We add the <configSections> and <system.web.webPages.razor> tags inside the <configuration> tag.
<configSections>
<sectionGroup name="system.web.webPages.razor" type="System.Web.WebPages.Razor.Configuration.RazorWebSectionGroup, System.Web.WebPages.Razor, Version=3.0.0.0, Culture=neutral, PublicKeyToken=31BF3856AD364E35">
<section name="host" type="System.Web.WebPages.Razor.Configuration.HostSection, System.Web.WebPages.Razor, Version=3.0.0.0, Culture=neutral, PublicKeyToken=31BF3856AD364E35" requirePermission="false" />
<section name="pages" type="System.Web.WebPages.Razor.Configuration.RazorPagesSection, System.Web.WebPages.Razor, Version=3.0.0.0, Culture=neutral, PublicKeyToken=31BF3856AD364E35" requirePermission="false" />
</sectionGroup>
</configSections>
<system.web.webPages.razor>
<host factoryType="System.Web.Mvc.MvcWebRazorHostFactory, System.Web.Mvc, Version=5.2.2.0, Culture=neutral, PublicKeyToken=31BF3856AD364E35" />
<pages pageBaseType="System.Web.Mvc.WebViewPage">
<namespaces>
<add namespace="System.Web.Mvc" />
<add namespace="System.Web.Mvc.Ajax" />
<add namespace="System.Web.Mvc.Html" />
<add namespace="System.Web.Routing" />
</namespaces>
</pages>
</system.web.webPages.razor>
The updated web.config file is as follows.
<?xml version="1.0" encoding="utf-8"?>
<!--
For more information on how to configure your ASP.NET application, please visit
https://go.microsoft.com/fwlink/?LinkId=169433
-->
<configuration>
<configSections>
<sectionGroup name="system.web.webPages.razor" type="System.Web.WebPages.Razor.Configuration.RazorWebSectionGroup, System.Web.WebPages.Razor, Version=3.0.0.0, Culture=neutral, PublicKeyToken=31BF3856AD364E35">
<section name="host" type="System.Web.WebPages.Razor.Configuration.HostSection, System.Web.WebPages.Razor, Version=3.0.0.0, Culture=neutral, PublicKeyToken=31BF3856AD364E35" requirePermission="false" />
<section name="pages" type="System.Web.WebPages.Razor.Configuration.RazorPagesSection, System.Web.WebPages.Razor, Version=3.0.0.0, Culture=neutral, PublicKeyToken=31BF3856AD364E35" requirePermission="false" />
</sectionGroup>
</configSections>
<system.web>
<compilation debug="true" targetFramework="4.7.2" />
<httpRuntime targetFramework="4.7.2" />
</system.web>
<system.web.webPages.razor>
<host factoryType="System.Web.Mvc.MvcWebRazorHostFactory, System.Web.Mvc, Version=5.2.2.0, Culture=neutral, PublicKeyToken=31BF3856AD364E35" />
<pages pageBaseType="System.Web.Mvc.WebViewPage">
<namespaces>
<add namespace="System.Web.Mvc" />
<add namespace="System.Web.Mvc.Ajax" />
<add namespace="System.Web.Mvc.Html" />
<add namespace="System.Web.Routing" />
</namespaces>
</pages>
</system.web.webPages.razor>
<system.codedom>
<compilers>
<compiler language="c#;cs;csharp" extension=".cs" type="Microsoft.CodeDom.Providers.DotNetCompilerPlatform.CSharpCodeProvider, Microsoft.CodeDom.Providers.DotNetCompilerPlatform, Version=2.0.1.0, Culture=neutral, PublicKeyToken=31bf3856ad364e35" warningLevel="4" compilerOptions="/langversion:default /nowarn:1659;1699;1701" />
<compiler language="vb;vbs;visualbasic;vbscript" extension=".vb" type="Microsoft.CodeDom.Providers.DotNetCompilerPlatform.VBCodeProvider, Microsoft.CodeDom.Providers.DotNetCompilerPlatform, Version=2.0.1.0, Culture=neutral, PublicKeyToken=31bf3856ad364e35" warningLevel="4" compilerOptions="/langversion:default /nowarn:41008 /define:_MYTYPE=\"Web\" /optionInfer+" />
</compilers>
</system.codedom>
<runtime>
<assemblyBinding xmlns="urn:schemas-microsoft-com:asm.v1">
<dependentAssembly>
<assemblyIdentity name="System.Web.Razor" publicKeyToken="31bf3856ad364e35" culture="neutral" />
<bindingRedirect oldVersion="0.0.0.0-3.0.0.0" newVersion="3.0.0.0" />
</dependentAssembly>
<dependentAssembly>
<assemblyIdentity name="System.Web.Helpers" publicKeyToken="31bf3856ad364e35" />
<bindingRedirect oldVersion="1.0.0.0-3.0.0.0" newVersion="3.0.0.0" />
</dependentAssembly>
<dependentAssembly>
<assemblyIdentity name="System.Web.WebPages" publicKeyToken="31bf3856ad364e35" />
<bindingRedirect oldVersion="0.0.0.0-3.0.0.0" newVersion="3.0.0.0" />
</dependentAssembly>
<dependentAssembly>
<assemblyIdentity name="System.Web.WebPages.Razor" publicKeyToken="31bf3856ad364e35" culture="neutral" />
<bindingRedirect oldVersion="0.0.0.0-3.0.0.0" newVersion="3.0.0.0" />
</dependentAssembly>
<dependentAssembly>
<assemblyIdentity name="System.Web.Mvc" publicKeyToken="31bf3856ad364e35" />
<bindingRedirect oldVersion="1.0.0.0-5.2.7.0" newVersion="5.2.7.0" />
</dependentAssembly>
</assemblyBinding>
</runtime>
</configuration>
Again, rebuild the project by pressing CTRL+SHIFT+B and run the project by pressing CTRL+F5 or F5. Now, We get the expected view page.
NOTE: The <configSections> must be the first child tag of <configuration> tag.


No comments:
Post a Comment