
The ASP.NET Core is Microsoft new framework to develop cross-platform, high-performance and light-weight web application, web API and Internet of Things. The ASP.NET Core Framework is open source available at GitHub. The developer can modify the code as per his need. The ASP.NET Core Framework is scalable, light-weight and cross-platform web framework.
Microsoft has taken a great leap with developing ASP.NET Core web framework which is completely new compared to existing ASP.NET frameworks. The ASP.NET Core Framework is completely rewritten instead of modifications of the existing ASP.NET4.6 framework which can be used at Windows, Linux and Mac platforms.
Benefits of ASP.NET Core Framework
- Open Source: As already pointed out that ASP.NET Core Framework is open source, the source code is available at GitHub and ASP.NET developer can read it and modify it as per his need.
- Cross-platform: The ASP.NET Core Framework can be used on different kind of platforms like Windows Linux, Macintosh. The cross-platform feature of ASP.NET Core makes it highly viable in the existing web applications world.
- Full Control over HTML and HTTP Requests: The ASP.NET Core Framework provides full control over the HTML and HTTP requests. Now, the developers can use HTML, CSS and JavaScript frameworks in their ASP.NET Core applications. For example, Bootstrap, Angular, jQuery, React and other frameworks can be used in ASP.NET Core applications. So, developers have full control over the HTML and HTTP requests during the development of ASP.NET Core web applications.
- Unified MVC and Web API: Another important feature of ASP.NET Core web application is that it provide unified MVC and Web API framework. In earlier versions of web frameworks, there were separate projects for web application and web API but ASP.NET Core framework has unified them. Now, in the same project, web API and web application both can coexist. Earlier, developers had to develop separate projects for web API and web applications.
- Dependency Injection: The ASP.NET Core frameworks provide feature of dependency injection (DI) and inversion of control. The dependency injection feature is very appealing because now the developers can inject dependencies in the applications as and when required to develop loosely coupled application.
- Pipelines: The ASP.NET Core frameworks provide request and response pipelines in the application. The services can be added and removed in the pipelines when required. A pipeline consists of a chain of processing elements (processes, threads, functions, etc.), arranged so that the output of each element is the input of the next. A set of interrelated tasks are performed in a pipeline, where the output of one task becomes input of the next task.
- Easy Testing: Important feature of ASP.NET Core Framework is that it provides testing of the application easy. The testing project can be added in the existing ASP.NET Core project.
- Better than Before: ASP.NET Core applications do not have global.asax and web config files which are found is ASP.NET applications before .NET Core. Also HTTP handlers and HTTP models have been removed from the ASP.NET Core. The ASP.NET page life cycle model is not required in ASP.NET Core applications.
The ASP.NET Core Environment Setup
To develop any ASP.NET Core web application, Microsoft provides .NET Core SDK. The SDK stands for Software Development Kit. The ASP.NET Core is a part of .NET Core SDK and we don't require it to be installed separately if .NET Core SDK is already installed.
Apart from the ASP.NET Core SDK, we also require an IDE(Integrated Development Environment) to develop ASP.NET Core application. Generally we use Visual Studio as an IDE to develop any ASP.NET Core applications.
- The ASP.NET Core applications can be developed using Visual Studio Code or any other notepad like Sublime, Atom. To run a ASP.NET Core applications, we need .NET Core Runtime.
The .NET Core Runtime software is required to run an existing ASP.NET Core application. The ASP.NET Core Runtime contains all the necessary resources or libraries to execute ASP.NET Core applications.
How to create ASP.NET Core Application
To create an ASP.NET Core application, we need IDE, Template selection, Version decision of the .NET framework. Apart from that we may need NuGet packages and Client Side libraries.
Template
To create an ASP.NET Core application, we use Visual Studio or Visual Studio IDE. They provide different kind of templates to develop different kind of ASP.NET Core applications. To develop a ASP.NET Core web application, we select a template from a set of templates provided in these IDEs. In the Visual Studio, we get different kind of templates like API, Web Application, Angular, React, React and Redux, Razor Class Library, Web Application MVC etc. We can choose Empty template to begin from the scratch. The Empty project template can be used to create ASP.NET Core application which contains the minimal files and folders and core frameworks.
Version
ASP.NET Core web application can be developed using different versions of ASP.NET Core framework. When we start developing the ASP.NET Core application, we should select the latest ASP.NET Core version.
Authentication
We should change the authentication to "No Authentication" and uncheck the "Configure for HTTPS" to keep the application simple. After doing all these steps, we click the OK button. Now, the default files and folders are loaded in the Solution Explorer pane of the Visual Studio.
Files and folders Structure
Files and folders in ASP.NET Core with Empty Template, Version 5.0

Files and folders in ASP.NET Core Web App (Model-View-Controller) Template, Version 5.0


EXPLORING FILES AND FOLDERS
Dependencies
Now we will analyze the different files and folders of the solution Explorer. First of all, we talk about the dependencies. The dependencies are packages which are required in the ASP.NET Core application. Click the Dependencies node in solution explorer to see the installed frameworks and packages. The NuGet packages are shown inside this dependencies node.
Application level settings
The appsettings.json file contains the global settings for the the web application. Earlier this task was performed using web.config file. The web.config file is an XML file but as per the new trend JSON file is preferred compared to XML file. Microsoft has accepted this preference and has used JSON file to provide application level configuration using appsettings.json file.
Another important file is Program class file.
Program File
The Program file contains the Main method which is the starting point of the ASP.NET Core web application. The ASP.NET Core web application starts as a console application. As we know that a console application contains Main method which works as starting point of the application. In the ASP.NET Core web application, Main method is the starting point of the application. The ASP.NET Core web application is transformed from the console application into web applications because of some methods which are called by the Main method. When the ASP.NET Core application is run for the first time, Main Method runs. This configures the console application and converts it into a web application. In fact, the Main method does not configure the console application into web application. The Main method delegates this configuration task to different static methods. We will see about this Main method in the forthcoming sections.
Remember the following points.
Application is configured using WebHost or WebHostBuilder.
First approach is using Startup
public class Program
    {
        public static void Main(string[] args)
        {
            CreateHostBuilder(args).Build().Run();
        }

        public static IHostBuilder CreateHostBuilder(string[] args) =>
            Host.CreateDefaultBuilder(args)
                .ConfigureWebHostDefaults(webBuilder =>
                {
                    webBuilder.UseStartup();
                });
    }
Second approach is without using Startup. In this case, Startup file is not required. The configuration of services and HTTP pipeline are in the Program class as shown below.
public class Program
    {
        public static void Main(string[] args)
        {
            IHostBuilder hostBuilder = Host.CreateDefaultBuilder(args);

            hostBuilder.ConfigureWebHostDefaults(
                webBuilder =>
                {
                    webBuilder.ConfigureLogging(config =>
                    {
                        config.ClearProviders();
                        config.AddConsole();
                    });
                    webBuilder.ConfigureServices(
                    config =>
                    {
                        config.AddControllersWithViews();
                    });
                    webBuilder.Configure(app =>
                    {
                        app.UseDeveloperExceptionPage();
                        app.UseStaticFiles();
                        app.UseRouting();
                        app.UseEndpoints(endpoints => endpoints.MapDefaultControllerRoute());
                    });
                }
                ).Build().Run();
        }
    }
HostBuilder & WebHostBuilder
Remember that ASP.NET Core web application is nothing but a console application transformed into web application because of HostBuilder and WebHostBuilder classes. Just as when a party is hosted, all the required necessities of the party such as the number of guests, the food, tables etc. are managed by the party host manager. In the same way, to transfer the console application into web application, different classes such as HostBuilder and WebHostBuilder are used. The ConfigureWebHostDefaults of HostBuilder creates the default web environment required to transform the console application into a web application. All the default configurations such as logging, web environment, Kestrel web server, IIS integration etc. are done in the background. Hover the mouse over ConfigureWebHostDefaults method, we get the following hints.


Startup File
Now we talk about the Startup class file. The startup class file is a normal class file; it is normal in the sense that it does not inherit any other class or implement interface. This startup class file contains two important methods known as Configure and ConfigureServices methods. These two methods play very crucial roles in the application. The Configure method is used to configure the the HTTP pipeline of the application and the ConfigureServices method is used to register different services. These services are injected into application as constructor dependency injections. The constructor of Startup class is used to configure the IConfiguration and other framework objects.
private readonly IConfiguration config;

        public Startup(IConfiguration config)
        {
            this.config = config;
        }

Web Server in ASP.NET Core Web Application
We know that web application runs in a suitable environment provided by web server. A web server is a software program that hosts the web application and runs it. When you develop a web application, there is a development server which runs the web application. For example, when you run the dotnet web application during development, it runs under IIS Express server but in the production environment it runs in IIS web server environment when Windows platform is used. On Windows platform, IIS is used as web server in the production environment and IIS Express is used as the development server in the development environment.
ASP.NET Core web application is a cross platform application. As Kestrel is cross platform web server, Microsoft uses Kestrel as web server in ASP.NET Core web application.
Types of Web Server
First of all, we understand the meaning of following terms.
- Internal Web Server: The internal web server is a web server that interacts with the web application.
- External Web Server: The external web server is a web server that interacts with HTTP Request incoming from the internet.
- InProcess Web Server
- OutOfProcess Web Server
Web server can be used not only as an internal web server in the ASP.NET Core web application but also as an external web server. It means that Kestrel web server can be used as internet-facing web server as well as internal web server interacting with the web application. When ASP.NET Core web application is executed using the CLI, Kestrel web server works as an internal web server as well as an external web server. Before continuing further discussion we understand the concept of proxy server and reverse proxy server.
Proxy Server and Reverse Proxy Server
- Proxy server also called forward proxy works on behalf of client(s).
- Reverse Proxy server also called Reverse proxy works on behalf of server(s).
- A proxy is used to protect clients while a reverse proxy is used to protect servers.
- The proxy server and reverse proxy server contain firewall to protect the clients and servers respectively.
A proxy server (also called forward proxy) provides proxy services to a client or a group of clients. A proxy is used to protect clients while a reverse proxy is used to protect servers. A forward proxy proxies on behalf of clients (or requesting hosts).
Suppose a client C1 requests for a file existing on server S1. Let a forward proxy F1 exists between client C1 and S1. The client request is first forwarded to the proxy F1 and then via firewall of forward proxy F1, the request is sent to the server S1. A reverse proxy server works on behalf of a server or a group of servers. The proxy server and reverse proxy server contain firewall to protect the clients and servers respectively.
The Kestrel web server can be used along with reverse proxy server. The reverse proxy server provides additional layer of configuration and security that is not available with the Kestrel server. It also help in maintaining the load balancing.
When an HTTP request comes from the internet it first goes to the reverse proxy server such as IIS, Apache, Nginx which acts as an external web server. The reverse proxy server passes the HTTP request to the Kestrel web server which acts as an internal web server. The Kestrel web server processes the request, it sends the response back to the reverse proxy server which in turn sends the response back to the client over the internet.
Question arises can we use the ASP.NET Core web application without using the built in kestrel web server. The answer is yes. We can use the in-process hosting model and in this case application is hosted inside the IIS worker process that is w3wp.exe. In case of IIS Express server, the iisexpress.exe is used. It means that Kestrel web server is not used with in-process hosting model.
A running program is known as process. In web application, the running web application is executed as a process. Already we have seen that web application process runs in a web host environment which is another process. Please remember that there is a client process and a server process.
In the case of ASP.NET Core out-of-process hosting model, there are two web servers. The first one is an internal web server which is the Kestrel web server and second one is is an external web server which can be IIS, Apache or Nginx etc.
The important point to remember is that in case of out-of-process hosting model it is not always necessary that the external web server will be used. The external web server may or may not be used.
OutOfProcess Configuration in ASP.NET Core
The question arises how out of process hosting model is configured in asp.net Core web application. To configure the.net web application as out-of-process hosting model, we use the project file and AspNetCoreHostingModel tag is marked as OutOfProcess. This is shown below.

Another way to accomplish this is to delete AspNetCoreHostingModel tag in the project file. By default, out-of-process hosting model is used in the ASP.NET Core web application. So, deletion of AspNetCoreHostingModel tag configures the application for OutOfProcess hosting model.
Hosting Environment and Model
By default, the web host model used in the ASP.NET Core web application project is in-process model. The InProcess model is used with IIS server.
For InProcess web hosting configuration in ASP.NET Core web application we edit the project file and make changes in the tag AspNetCoreHostingModel. Project file contains the details of Target Framework used in the project apart from hosting details.
What is Kestrel web server in ASP.NET Core?
As we know that ASP.NET Core web application is cross platform application. The web server is cross platform server. It is used as internal web server which process the incoming http request from the client. In case of web server the process used to run the application is known as dotnet.exe.
When ASP.NET Core application is executed in Visual Studio ID then IIS Express process is used to execute the application. The process hosts the web application and runs it.
ASP.NET Core Application with CLI
We also can execute the ASP.NET Core application using .NET Core command line tool.
In this tutorial, we will learn how to create and run asp.net Core web application using command line interface. Open the cmd.exe file using the run dialogue box. When you open the CMD terminal, type dotnet and press Enter key. We get the following.

We can run the dotnet command inside the Visual Studio code as well the Visual Studio code provides the terminal to run PowerShell or command line interface.
If you want to create a new dotnet project then type dotnet new command in the command line interface. Once you press ENTER, you get the complete list of template name and their short name. You also get examples how to create Dot Net project in MVC template etc.

To create a ASP.NET Core web application, we use the the templates shortcut in the CMD. For example the following command will create a ASP.NET Core web application project.
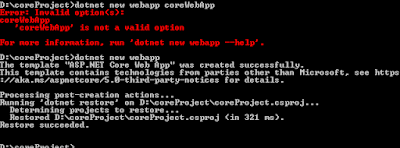
We can open the ASP.NET Core web application project in Visual Studio code and we can see all the packages installed inside the project.

To run the project, first of all, change directory and move inside the project folder and use the following command in the CMD or the terminal and press the enter key.
dotnet run.

We find the URL at which the server is listening the HTTP or HTTPS request. Note that when the application is installed HTTPS or HTTP configuration is checked or unchecked. If you use the HTTPS then follow the URL which begins with HTTPS. Click the URL to open the application in the browser. We get the following default result in the browser.

To shutdown the application, we use the command, Control + C inside the terminal.
Throughout the project development the Startup class file is used again and again because this file is modified again and again as per the need of the project to add or remove middleware to change the services in application or to change the application configuration as per the HTTP pipeline.
Configuration Settings in ASP.NET Core
There are two important configuration settings files available in ASP.NET Core web application project named as appsettings and launchsettings. They are JSON files and they contain different setting information which are used by the server. You might be thinking why there are two files for settings instead of one single file. The reason is that launchsettings file is used only in the development environment and not in the production environment while appsettings file is used in both the environments.
The launchsettings JSON file
If we think about the name of the launchsettings file name, it suggests that it is all about launching the application. So what is launching is all about. Launching is all about the web server and the browser involved in the launching of the project. This launchsettings file contains the details of of IIS express or any other server and the launching Browser plus the URL at which the application will be launched. Also, it contains information about the application environment which can be development or production. This information is also provided in this file.
In this tutorial, we will learn about launchsettings JSON file. This file is required during the local development process and not in the production server. We make only thing certain settings about the application in the launch setting file. When we publish the application, this launchsettings file is not required at that time. The default launchsettings configuration is shown below.
{
  "iisSettings": {
    "windowsAuthentication": false,
    "anonymousAuthentication": true,
    "iisExpress": {
      "applicationUrl": "http://localhost:39384",
      "sslPort": 44395
    }
  },
  "profiles": {
    "IIS Express": {
      "commandName": "IISExpress",
      "launchBrowser": true,
      "environmentVariables": {
        "ASPNETCORE_ENVIRONMENT": "Development"
      }
    },
    "coreProject": {
      "commandName": "Project",
      "dotnetRunMessages": "true",
      "launchBrowser": true,
      "applicationUrl": "https://localhost:5001;http://localhost:5000",
      "environmentVariables": {
        "ASPNETCORE_ENVIRONMENT": "Development"
      }
    }
  }
}
The appsettings JSON file
The most of the configuration settings of the application is done in the appsettings JSON file. The server wants to know about the settings required for the web application and all such details are provided by the appsettings file. The app setting file contains the details of global variables and their values, connection strings and their values etc. The default appsettings configuration is shown below.
{
  "Logging": {
    "LogLevel": {
      "Default": "Information",
      "Microsoft": "Warning",
      "Microsoft.Hosting.Lifetime": "Information"
    }
  },
  "AllowedHosts": "*"
}
Startup
Note that as far as configuration is concerned, the configuration information is contained not only within appsettings and launchsettings files. Rather, very important information such as middleware and pipeline are configured inside the Startup class file.
When the application starts, it looks at the Startup class file for the services configuration and pipeline settings apart from looking at the appsettings and launchsettings of the application.
Tips: Remember that in the Configure and ConfigureServices methods of the Startup class file, we pass different interface reference variables as parameters to allow configuration of application environment variables or the services. For example, IConfiguration, IServiceCollection, IApplicationBuilder, IHostingEnvironment etc. interfaces reference variables are used as parameters inside these methods. Reference variable of an interface will invoke its method which will be implemented inside the method using the the reference variable as parameter. Also remember that we can pass such reference variables inside the constructor of the Startup class.
Dependency Injections
Also remember that dependencies are packages which are used inside the ASP.NET Core web application. We inject a dependency inside the application to have loosely coupled system and it is achieved by using reference variable of the interface of the dependency. Dependency Injections are very famous because they help in building loosely coupled application.
Middleware Component
Now I will discuss about middleware components which are used in ASP.NET Core web application very often. The middleware components are software components or classes which are assembled into web application pipeline to handle the HTTP requests and responses. Now we understand what it all means.
Already we know that in software engineering, pipeline implies different functions, thread etc. which communicate with each other to carry out some task as a whole which will be partially completed individually by them. Imagine we have a big task to perform in the application. So what we do usually? We create different functions which carry out different piece of the big task. One function invokes another one function to complete the next required chunk of task and maybe the second function will call another one function to complete another chunk of task. So, we find that functions together will complete the big task. The same concept is applied in case of middleware.
A middleware is a middle software component which is injected in the application to perform a task in the pipeline. Pipelining implies chain of middleware components which are assembled in a definite order to accomplish the big task. This concept is used in web application to perform the HTTP request or response. The HTTP pipeline holds a number of middleware components in definite order to accomplish the desired HTTP request or response.
There are many inbuilt middleware components available in the .NET core web application framework. We can also create our own custom middleware as per our need. We must keep in mind that a middleware performs a specific task and so a middleware component should be created only if there is no existing inbuild middleware component which can perform the task what we desire.
Middleware components are required for a vast array of http request and response. For example, for the authorization of the http request, we can have a middleware component. Similarly for the http request for a static file, we can have the requirement of middleware component. Thus, there are different situations of http request and response where middleware components are required. Remember that middleware components are always created for a specific task.
Now the question is how middleware components are configured in the asp.net core web application. The answer is middleware components are injected as dependency injection inside the Startup class file. The Startup class file has Configure method which is passed middleware component as a parameter.

Examples of middleware in Startup class are as follows.
- Authentication Middleware: This is used to authenticate request made by an application, e.g. in handling the login and logout functionality.
- Compression Middleware: This is used to compress the response payload to reduce the amount of data transferred over the network and thereby improving the performance.
- CORS Middleware: This is used to handle cross-domain requests by allowing or denying specific origins.
- Exception Handling Middleware: This is used to handle exceptions that occur during request processing.
- HTTPS Redirection Middleware: This is used to redirect HTTP requests to HTTPS to secure the sensitive data transmittion.
- Routing Middleware: This is used to map incoming requests to the appropriate action in a controller.
- Session Middleware: This is used to store user-specific data between requests, useful in persisting the shopping cart contents.
- Static Files Middleware: This is used to serve different static files, such as images, CSS, and JavaScript files to the clients.
The middleware are placed in a definite order in http pipeline to get them work properly.
What is short circuiting of middleware components?
We know that circuit means path. When http request reaches to a middleware, it is processed and send to the next middleware for further processing. Similarly, the second middleware sends the request to the third middleware and so on. In this way, http request path is created virtually from one middleware to the last middleware. The last middleware is one after which the http request is not forwarded to any other middleware. What happens if any intermediate middleware stops sending the processing request to its next middleware. Then http request is not sent to the next middleware. Rather, the http response is returned back. This situation is known as short circuiting of middleware.
The short circuiting of middleware implies that the http request is not sent to the the next existing middleware for further processing.
RequestDelegate
RequestDelegate is a delegate that is used to by middleware to handle HTTP request in the HTTP Pipeline in ASP.NET Core application. The Request delegate takes HttpRequest as a parameter.
public delegate Task RequestDelegate(HttpContext context);
Two facts about a delegate:
- A delegate can be passed as a parameter in a method.
- A delegate is used to execute a method. Using a delegate, any method can be executed which signature matches with the delegate definition.
Request delegate calls any method which processes the HTTP Request as per the requirements. In short request delegate handles the incoming http request. By using some extension methods, for example, Run, Map and Use methods, request delegate can be invoked. Run extension method is used to short circuit the middleware. On the other hand Use extension method is used to add middleware which will call the next middleware.
We can also use anonymous method or lambda expression in request delegate. Lambda expression is a short notation to write function. A function has input and output parameters. We pass different http request objects as input parameters. These objects help in processing the http request.
Creating custom Middleware
To create a middleware, we create a class which constructor takes RequestDelegate and it contains a method with HttpContext parameter which returns a Task. This method is generally named Invoke. It means that middleware is initialized due to RequestDelegate. The constructor DI is used to initialize the parameter. As RequestDelegate is a framework object. We don't need to register its service. We may have to install the Microsoft.AspNetCore.Http.Abstractions package if it is missing. RequestDelegate is used to invoke next middleware of the pipeline.
public class TestMiddleware
    {
        private readonly RequestDelegate requestDelegate;

        public TestMiddleware(RequestDelegate requestDelegate)
        {
            this.requestDelegate = requestDelegate;
        }
        public async Task Invoke(HttpContext context)
        {
            // your business logic for request
            requestDelegate(context);
            // your business logic for response

        }
        private async Task HelperMethod()
        {
            // method consumed by the middleware
        }
    }
Practical Example of Custom Middleware
Create web project using ASP.NET Core Web App (Model-View-Controller) template.
- Project name: CoreCustomMiddleware
- Solution name: CoreCustomMiddleware
- .NET Core version: 6.0
LoggingMiddleware: Create Custom folder and add a LoggingMiddleware class. The code is as follows.
namespace CoreCustomMiddleware.Custom
{
    public class LoggingMiddleware
    {
        private readonly RequestDelegate _next;

        public LoggingMiddleware(RequestDelegate next)
        {
            _next = next;
        }
        public async Task InvokeAsync(HttpContext httpContext)
        {
            var startTime = DateTime.Now;
            await Console.Out.WriteLineAsync("Middleware request log: Logging in the console");
            await _next(httpContext);
            var endTime = DateTime.Now;
            var elapsedTime = endTime - startTime;
            var logMessage = $"Middleware response log. Method: {httpContext.Request.Method} Path: {httpContext.Request.Path} StatusCode: {httpContext.Response.StatusCode} TotalMilliseconds: {elapsedTime.TotalMilliseconds}ms";
            Console.WriteLine(logMessage);
        }
    }
} Program: Update the Program file as shown below. Register the custom middleware using UseMiddleware method. Also, configured the logging.
using CoreCustomMiddleware.Custom;

var builder = WebApplication.CreateBuilder(args);
builder.Host.ConfigureLogging(configureLogging =>
{
    configureLogging.ClearProviders();
    configureLogging.AddConsole();
});

// Add services to the container.
builder.Services.AddControllersWithViews();
var app = builder.Build();

// Configure the HTTP request pipeline.
if (!app.Environment.IsDevelopment())
{
    app.UseExceptionHandler("/Home/Error");
    app.UseHsts();
}

app.UseMiddleware();

app.UseHttpsRedirection();
app.UseStaticFiles();

app.UseRouting();

app.MapControllerRoute(
    name: "default",
    pattern: "{controller=Home}/{action=Index}/{id?}");

app.Run();
HomeController: The ILogger is used in this class. Note that it is built-in framework with dependency injection feature.
using Microsoft.AspNetCore.Mvc;

namespace CoreCustomMiddleware.Controllers
{
    public class HomeController : Controller
    {
        private readonly ILogger<HomeController> _logger;

        public HomeController(ILogger<HomeController> logger)
        {
            _logger = logger;
        }

        public IActionResult Index()
        {
            _logger.LogInformation("request log: Inside HomeController Index action");
            return View();
        }
    }
}

Edited on 11th July 2023


No comments:
Post a Comment