
In this tutorial we will learn about how to upload any kind of file into the database. Uploading file into database means saving the file as byte array into database as a record of table. For this purpose, we will use ASP.NET Core technology and Visual Studio 2022 IDE.
- We need Visual Studio 2022 IDE.
- We need ASP.NET Core SDK installed in the system.
- We need internet connection to download NuGet and other packages during project development.
- We need SQL Server Management Studio 2018 to deal with SQLServer database.
- Template will be ASP.NET Core Empty
- Framework version will be ASP.NET Core 5.0
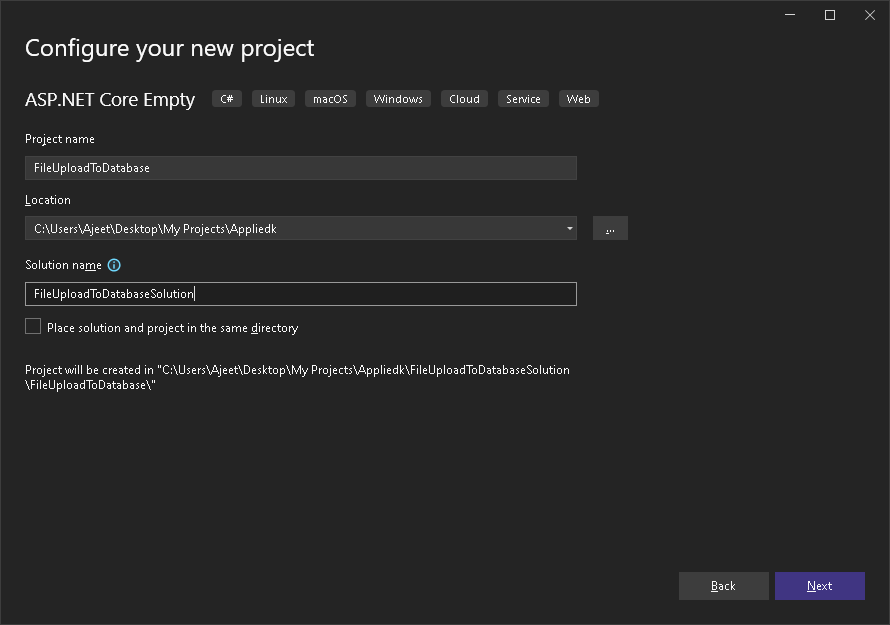
- Project name will be FileUploadToDatabase
- Solution name will be FileUploadToDatabaseSolution
STEP1. Open the Visual Studio 2022. In the Get Started, click the "Create a new project".

STEP2. Search the ASP.NET CORE EMPTY template in the search box. Select the ASP.NET Core Empty template. Click the Next button.

STEP3. Fill the details of the application in the "Configure your new project" as shown below.
STEP4. Fill the "Additional Information" as shown below. The .NET 5.0 version is used in application. Click the Create button.

STEP5. When we create the project, following files and folders are created in the "Solution Explorer" as shown below.

Click the "ShowAll Files" to expand the folders to get their contets. These are the default files and folders which are created when Empty template is selected to create the project. These contents are minimum files required to provide web host environment. But we need additional files and folder to convert this project into MVC Web application.
If we run the application now, we get Hello World message in the browser. This message is coming because of MapGet method given in the Startup class.
NuGet Package Manager
Install Packages using NuGet Package Manager Console. The NuGet Package Manager Console is used to download packages from NuGet. To open the Package Manager Console in Visual Studio, do the following steps.
Tools > NuGet Package Manager > Package Manager Console
The Package Manager Console will appear as shown below.
EntityFrameworkCore packages
We download the packages using commands in the Package Manager Console. Run the following commands one by one to download and install the EntityFrameworkCore packages needed in the project.
- PM> Install-Package Microsoft.EntityFrameworkCore -Version 5.0
- PM> Install-Package Microsoft.EntityFrameworkCore.Design -Version 5.0
- PM> Install-Package Microsoft.EntityFrameworkCore.Tools -Version 5.0
- PM> Install-Package Microsoft.EntityFrameworkCore.SqlServer -Version 5.0
Rebuild the project. Note that Packages node is created in the Solution Explorer. All the installed packages are visible in the Packages node.
Note that for the CRUD operations, we will use SQL Server database. This is why we are using EntityFrameworkCore package related to SQL Server.
Create Folders Required for the MVC Application
Create the following three folders to convert this project into MVC project. The details of these folders are given ahead.
- Models
- Views
- Controllers
Create the following additional folders in this project. These are needed for files upload. The details of these folders are given one by one.
- wwwroot
- Data
wwwroot: This folder contains all the static file such as Bootstrap, CSS, JavaScript etc. The wwwroot is the WebRootFolder of the application. We add client side libraries in this folder. This folder is needed in almost all the applications in which views are used to provide UI to the application. We will discuss about it later.
Data: In this folder, we create the class files needed for CRUD operations using Entity Framework. The DbContext class file will be used in this. We will discuss about it later.
Add Client Side Library for UI
To add "Client Side Library", right click the "FileUploadToDatabase" project in the Solution Explorer. Click Add and then "Client Side Library" as shown below.

The Visual Studio will open the Add Client Side Library dialog as shown below.

Search twitter-bootstrap in the Library textbox. Use @ symbol to get a particular version of the library. For example, twitter-bootstrap@4.6.2. Expand the dialog box. Choose specific files radio button as shown below.
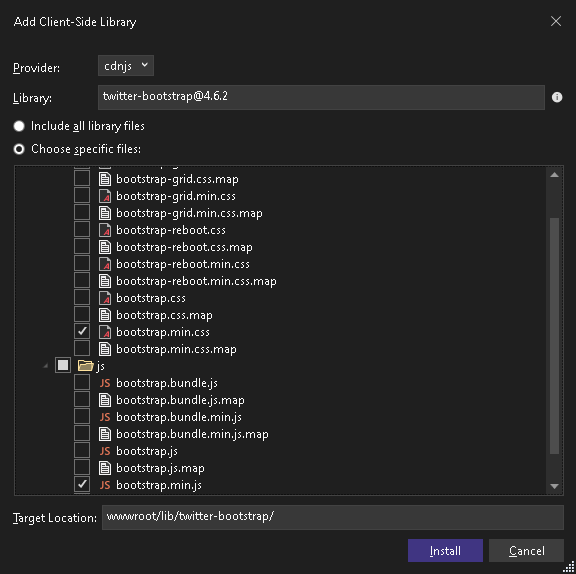
We have selected specific files (for example bootstrap.min.css and bootstrap.min.js). Click the Install button. These libraries will be installed inside the wwwroot folder. Also, libman.json will be created in the content root folder.
Double click the libman.json file. We get the schema of the libraries installed in the project as shown below.
{
  "version": "1.0",
  "defaultProvider": "cdnjs",
  "libraries": [
    {
      "library": "twitter-bootstrap@4.6.2",
      "destination": "wwwroot/twitter-bootstrap/",
      "files": [
        "js/bootstrap.min.js",
        "css/bootstrap.min.css"
      ]
    }
  ]
}
Right click the libman.json file. All the possible operations are given in the menu items as shown below.

It is obvious that installing and uninstalling the libraries and restoring them or changing the library versions is very easy using the libman.json file.
Add MVC Service
Adding the folders is not enough. We need to modify the Startup class file to include the MVC service in the project. We can use either AddMvc extension method or AddControllersWithViews extension method to enable the MVC service in the project. Inside the ConfigureServices method we include the service as shown below.
public void ConfigureServices(IServiceCollection services)
  {
  services.AddControllersWithViews();
  }
NOTE: You can learn about the differences among AddMvc, AddControllersWithViews, AddControllers and AddRazorPages extension methods in separate tutorial. Right now, it is enough to know that if we are using razor views in the project, we should use either AddMvc or AddControllersWithViews.
Add Middleware
Middleware are used in the ASP.NET Core to handle the HTTP requests and HTTP responses. By default following middleware are included in the Configure method in the Startup class file in this application. These are extension methods of IApplicationBuilder.
- UseDeveloperExceptionPage
- UseRouting
- UseEndpoints
public void Configure(IApplicationBuilder app, IWebHostEnvironment env)
        {
            if (env.IsDevelopment())
            {
                app.UseDeveloperExceptionPage();
            }

            app.UseRouting();

            app.UseEndpoints(endpoints =>
            {
                endpoints.MapGet("/", async context =>
                {
                    await context.Response.WriteAsync("Hello World!");
                });
            });
        }
NOTE: The IApplicationBuilder parameter of Configure method provides different middleware to handle the HTTP requests and responses. These middleware are included in the Configure method in a definite sequence as per the need of the application.
Middleware Examples
UseStaticFiles: As we have to deal with the static files such as BootStrap, CSS, JavaScript, add the UseStaticFiles middleware extension method in the application. Without adding this middleware, the Bootstrap CSS will not work.
UseRouting and UseEndpoints: The UseRouting middleware is used to enable routing in the application. But enabling routing is not enough. We need different endpoints in the application to handle different HTTP requests. The UseEndpoints middleware is used for this purpose. In MVC, the HTTP requests are handled by action methods of controllers in ASP.NET Core MVC. We use UseEndpoints middleware to add endpoints in the application.
- The default MapGet method will handle the HTTP GET requests only.
- To handle any kind of HTTP requests such as GET, POST, PUT etc., we use Map method.
- The MapControllerRoute method will map HTTP request to an action method of a controller.
MapControllerRoute:
This method takes name and pattern named parameters. The method will map the routes of all action methods of the controllers.
We remove the MapGet method and add the MapControllerRoute method. Its name parameter is the default. Its pattern parameter has a string pattern. In this string pattern, the controller and action are keywords and the value assigned to them are their default values. It means that if controller and action names are not given in the URL, then controller will be File and action will be Index(for the below example). The default endpoint will be Index method of the File controller in this application(It can be any controller but we have chosen FileController. This controller will be created inside Controllers folder later)
public void Configure(IApplicationBuilder app, IWebHostEnvironment env)
        {
            if (env.IsDevelopment())
            {
                app.UseDeveloperExceptionPage();
            }
            app.UseStaticFiles();
            app.UseRouting();

            app.UseEndpoints(endpoints =>
            {
                endpoints.MapControllerRoute(name: "default", pattern: "{controller=File}/{action=Index}/{Id?}");
            });
        }
Add FileController
Now include the FileController controller inside the Controllers folder. Select the Controllers folder and right click it. Click 'Add' and then 'Controllers' menu item.
The "Add New Scaffolded Item" opens. Select the "MVC Controller - Empty" template and click Add button.
We get the "Add New Item" dialog box. Rename the 'HomeController' to 'FileController' and click 'Add' button.
Visual Studio 2022 automatically creates Index action method in the FileController file. The FileController class file will be added in the Controllers folder.
The code in the FileController is as follows.
using Microsoft.AspNetCore.Mvc;

namespace FileUploadToDatabase.Controllers
{
    public class FileController : Controller
    {
        public IActionResult Index()
        {
            return View();
        }
    }
}
The above Index method returns a view using View() method. As the View method is parameter less, it will return a view which name will be the name of the method in which the method is. So, View method will return "Index" named view. Next, we create the Index razor view.
Add View
To add view, we can use manual technique or can take the help of Visual Studio. Inside the Views folder, create File folder and inside this folder, create a razor view named as Index. Or, Right click inside the Index method keeping cursor anywhere in the method. Click "Add View..." menu item. The "Add New Scaffolded Item" windows appears. Select "Razor View - Empty". Click Add button. The "Add New Item" window appears. Type "Index.cshtml" in the Name text box. Click Add button.
The Index view is created along with File folder in the Views folder as shown below.
Open the Index.cshtml file and clear its contents and write the following code in it.
Build the project and press F5 to run the application. As routing is enabled and action method of a controller is mapped in the Startup class file. We get no issue and the following output appears.

Add Models and Connection String
Now the application is good enough to include the file upload features in the application. We outline the points to be discussed to go ahead.
- Connection String in appsettings json file
- Models and ViewModel in Models folder
- First Approach with EF Core, AppDbContext class file in Data folder
- Common layout for views, tag helpers and Bootstrap
Connection String: Connection string keeps information about database server, it's database and password etc. Include the connection string in the appsettings.json file. The connection string provides valuable information to the Entity Framework to create tables mapped with the models in the database mentioned in the connection string. The connection string value is read by the entity frame work.
How to Add Connection String in appsettings.json file: Click "View" > "SQL Server Object Explorer" to open the SQL Server Object Explorer pane as shown below.

Right click the localdb and click the Properties. In the Properties pane, we get the Connection String in the "General" section. Copy the value of Connection String.
Now, open the appsettings.json file. Paste the copied value to a connection string named as DefaultConnection. So, we get the following connection string in the appsettings.json file.
{
  "Logging": {
    "LogLevel": {
      "Default": "Information",
      "Microsoft": "Warning",
      "Microsoft.Hosting.Lifetime": "Information"
    }
  },
  "ConnectionStrings": {
    "DefaultConnection": "Data Source=(localdb)\\MSSQLLocalDB;Initial Catalog=Appliedk2;Integrated Security=True;Connect Timeout=30;Encrypt=False;Trust Server Certificate=False;Application Intent=ReadWrite;Multi Subnet Failover=False"
  },
  "AllowedHosts": "*"
}
Models and ViewModel in Models folder:
First, we create models needed for the file upload and saving them in the database. We use Code First Approach with EF Core so that tables are created in database corresponding to classes created in the application. Add the following model class in the Models folder.
Models/FileModel.cs
using System;

namespace FileUploadToDatabase.Models
{
    public class FileModel
    {
        public int Id { get; set; }
        public string Name { get; set; }
        public string Description { get; set; }
        public string FileType { get; set; }
        public string Extension { get; set; }
        public string CreatedBy { get; set; }
        public DateTime? CreatedOn { get; set; }
        public byte[] FileBytes { get; set; }
    }
}
Data/AppDbContext.cs
Go in the Data folder and create AppDbContext class file and update the code of this class as shown below
using FileUploadToDatabase.Models;
using Microsoft.EntityFrameworkCore;

namespace FileUploadToDatabase.Data
{
    public class AppDbContext: DbContext
    {
        public AppDbContext(DbContextOptions options) : base(options)
        {
        }
        public DbSet tblFilesDb { get; set; }
    }
}
Add the built-in object IConfiguration using Framework Constructor DI in Startup class. This object is used to read configuration of the application from different sources such as appsettings.json file etc.
private readonly IConfiguration config;

        public Startup(IConfiguration config)
        {
            this.config = config;
        }
The config object is used to read configuration value from appsettings.json file. For example, we read the connection string from the appsettings.json file. The config object has GetConnectionString method especially to read the value of a connection string. This is shown in the below code.
Add the DbContext Service in Startup class
public void ConfigureServices(IServiceCollection services)
        {
            services.AddControllersWithViews();
            services.AddDbContext(options=>options.UseSqlServer(config.GetConnectionString("DefaultConnection")));
        }
Add Migration
The add-migration command is run to build the classes mentioned as DbSet properties in the AppDbContext class. The tables are generated after running the update-database command. The add-migration command will create Migrations folder in Solution Explorer. This folder contains the details of the classes generated after running the command.
PM> Add-Migration Initial
Build started...
Build succeeded.
To undo this action, use Remove-Migration.
Migrations folder is created in the Solution Explorer after running the add-migration command.
The update-database command is run to build tables in the database.
PM> update-database
Build started...
Build succeeded.
Done.
The tables are created in the AppliedK2 database after execution of update-database command.
Layout etc. for UI
Rebuild the project and run the application. We are getting no issue. Now, we convert the Index view into a UI which allows selecting multiple files and uploading them into the web server folder named as Files. Before going any further, we first create the following files.
- Views/Shared/_Layout.cshtml
- Views/ViewStart.cshtml
- Views/ViewImports.cshtml
Inside the Views folder, create Shared folder which will hold layout razor files. The Views folder contains other subfolders for each controller.
Inside the Views folder, we create ViewsImports and ViewStart files.
Add Layout Razor file:
Select the Shared folder. Right click and click Add > Views... The "Add New Scaffolded Item" windows appears. Select "Razor View - Empty". Click Add button. The "Add New Item" window appears. Select Razor Layout template. The default name _Layout.cshtml is okay. Click Add button. The _Layout.cshtml file is added in the Shared folder.
The content of layout view is as follows.
<!DOCTYPE html>

<html>
<head>
    <meta name="viewport" content="width=device-width" />
    <title>@ViewBag.Title</title>
    <link href="~/twitter-bootstrap/css/bootstrap.min.css" rel="stylesheet" />
</head>
<body>
    <div>
        @RenderBody()
    </div>
</body>
</html>
Add ViewStart Razor file:
Select the Views folder. Right click and click Add > Views... The "Add New Scaffolded Item" windows appears. Select "Razor View - Empty". Click Add button. The "Add New Item" window appears. Select Razor View Start template. The default name _ViewStart.cshtml is okay. Click Add button. The _ViewStart.cshtml file is added in the Views folder.
The content of _ViewStart view is as follows.
@{
    Layout = "_Layout";
}
Add ViewImports Razor file:
Select the Views folder. Right click and click Add > Views... The "Add New Scaffolded Item" windows appears. Select "Razor View - Empty". Click Add button. The "Add New Item" window appears. Select Razor View Imports template. The default name _ViewImports.cshtml is okay. Click Add button. The _ViewImports.cshtml file is added in the Views folder.
The content of _ViewImports view is nothing. We add the following code in it.
@using FileUploadToDatabase
@using FileUploadToDatabase.Models
@addTagHelper *, Microsoft.AspNetCore.Mvc.TagHelpers
Tips: To avoid the spelling error for tag helper, in the Solution Explorer, expand the Dependencies/Frameworks/Microsoft.AspNetCore.App node, search the Microsoft.AspNetCore.Mvc.TagHelpers. Right click it. Click Properties. Copy the "Assembly Name" text and paste it in the _ViewImports file.
Build the application.
Add the Bootstrap CSS in Layout Razor View
Open the Views/Shared/_Layout.cshtml file and update the code as shown below.
<!DOCTYPE html>

<html>
<head>
    <meta name="viewport" content="width=device-width" />
    <title>@ViewBag.Title</title>
    <link href="~/twitter-bootstrap/css/bootstrap.min.css" rel="stylesheet" />
</head>
<body>
    <div>
        @RenderBody()
    </div>
</body>
</html>
Final look at the Updated Startup class file is as given below.
using FileUploadToDatabase.Data;
using Microsoft.AspNetCore.Builder;
using Microsoft.AspNetCore.Hosting;
using Microsoft.EntityFrameworkCore;
using Microsoft.Extensions.Configuration;
using Microsoft.Extensions.DependencyInjection;
using Microsoft.Extensions.Hosting;

namespace FileUploadToDatabase
{
    public class Startup
    {
        private readonly IConfiguration config;

        public Startup(IConfiguration config)
        {
            this.config = config;
        }
        public void ConfigureServices(IServiceCollection services)
        {
            services.AddControllersWithViews();
            services.AddDbContext(options => options.UseSqlServer(config.GetConnectionString("DefaultConnection")));
        }

        public void Configure(IApplicationBuilder app, IWebHostEnvironment env)
        {
            if (env.IsDevelopment())
            {
                app.UseDeveloperExceptionPage();
            }
            app.UseStaticFiles();
            app.UseRouting();

            app.UseEndpoints(endpoints =>
            {
                endpoints.MapControllerRoute(name:"default",pattern:"{controller=File}/{action=Index}/{Id?}");
            });
        }
    }
}
Build the application. No issue found and hence go ahead.
We update the Views/File/Index.cshtml file. We remove the entire old code and add a form with input controls to allow upoading files and a button to submit the files. The uploaded files are processed by "UploadFilesToDatabase" action method of FileController class. Look at the following updated code.
@{
    Layout = "~/Views/Shared/_Layout.cshtml";
}

<div class="container">
    <h3>Upload files here</h3>
    <hr />
    <br/>
    <div class="alert-secondary">
        <h3>@TempData["Message"]</h3>
    </div>
    <br />

    <form method="post" enctype="multipart/form-data">
        <input type="file" name="files" required multiple />
        <input type="text" name="description" required />
        <button type="submit" asp-action="UploadFilesToDatabase" asp-controller="File" class="btn btn-primary">Upload files to database</button>
    </form>
</div>
Now we update the FileController. We create an instance of MemoryStream and copy the file into the MemoryStream. Note that we can easily convert memory stream into byte array using ToArray method. The updated code is as follows.
using FileUploadToDatabase.Data;
using FileUploadToDatabase.Models;
using Microsoft.AspNetCore.Http;
using Microsoft.AspNetCore.Mvc;
using System;
using System.Collections.Generic;
using System.IO;
using System.Linq;

namespace FileUploadToDatabase.Controllers
{
    public class FileController : Controller
    {
        private readonly AppDbContext context;

        public FileController(AppDbContext context)
        {
            this.context = context;
        }
        public IActionResult Index()
        {
            return View();
        }

        [HttpPost]
        public IActionResult UploadFilesToDatabase(List files, string description)
        {
            foreach (var file in files)
            {
                if (file.Length > 0 && file.ContentType.StartsWith("image/"))
                {
                    MemoryStream ms = new MemoryStream();
                    file.CopyTo(ms);
                    byte[] filebytes = ms.ToArray();
                    FileModel fileModel = new FileModel()
                    {
                        Name = file.FileName,
                        Description = description,
                        FileType = file.ContentType,
                        Extension = System.IO.Path.GetExtension(file.FileName),
                        CreatedBy = Environment.UserName,
                        CreatedOn = DateTime.UtcNow,
                        FileBytes = filebytes
                    };
                    context.Add(fileModel);
                    context.SaveChanges();
                    TempData["Message"] = "File(s) uploaded successfully!";
                }
            }
            return RedirectToAction("Index");
        }
    }
}
If we run the application now, we can upload files and save them into database. But what if we want to display the list of all uploaded files as well in the Index view. For this we need to update the Index view and FileController. We create a private method "GetAllFiles" which will fetch all the records from the database table and then we can pass the records as model object to the view parameter into the Index action method. When we pass the model object to the Index view, we must use @model IEnumerable <FileModel> in the Index view at the top line. The updated Index view and FileController are given below.
Updated Index view is given below.
@model IEnumerable<FileModel>
@{
    Layout = "~/Views/Shared/_Layout.cshtml";
}

<div class="container">
    <h3>Upload files here</h3>
    <hr />
    <br/>
    <div class="alert-secondary">
        <h3>@TempData["Message"]</h3>
    </div>
    <br />

    <form method="post" enctype="multipart/form-data">
        <input type="file" name="files" required multiple />
        <input type="text" name="description" required />
        <button type="submit" asp-action="UploadFilesToDatabase" asp-controller="File" class="btn btn-primary">Upload files to database</button>
    </form>
</div>
<br/>
<div class="container">
    <h4>List of upoaded files in database</h4>
    <table class="table table-striped">
        <thead>
            <tr>
                <th>Name</th>
                <th>Description</th>
                <th>File Type</th>
                <th>Extension</th>
                <th>Created By</th>
                <th>Created On</th>
                <th>Actions</th>
            </tr>
        </thead>
        <tbody>
            @foreach (var file in Model)
            {
                <tr>
                    <td>@file.Name</td>
                    <td>@file.Description</td>
                    <td>@file.FileType</td>
                    <td>@file.Extension</td>
                    <td>@file.CreatedBy</td>
                    <td>@file.CreatedOn</td>
                    <td><a class="btn btn-primary" asp-controller="File" asp-action="DownloadFile" asp-route-id="@file.Id">Download</a></td>
                    <td><a class="btn btn-danger" asp-controller="File" asp-action="DeleteFile" asp-route-id="@file.Id">Delete</a></td>
                </tr>
            }
        </tbody>
    </table>
</div>
Updated FileController is given below.
using FileUploadToDatabase.Data;
using FileUploadToDatabase.Models;
using Microsoft.AspNetCore.Http;
using Microsoft.AspNetCore.Mvc;
using System;
using System.Collections.Generic;
using System.IO;
using System.Linq;

namespace FileUploadToDatabase.Controllers
{
    public class FileController : Controller
    {
        private readonly AppDbContext context;

        public FileController(AppDbContext context)
        {
            this.context = context;
        }
        public IActionResult Index()
        {
            var files = GetAllFiles();
            return View(files);
        }
        private List GetAllFiles()
        {
            return context.tblFilesDb.ToList();
        }

        [HttpPost]
        public IActionResult UploadFilesToDatabase(List files, string description)
        {
            foreach (var file in files)
            {
                if (file.Length > 0 && file.ContentType.StartsWith("image/"))
                {
                    MemoryStream ms = new MemoryStream();
                    file.CopyTo(ms);
                    byte[] filebytes = ms.ToArray();
                    FileModel fileModel = new FileModel()
                    {
                        Name = file.FileName,
                        Description = description,
                        FileType = file.ContentType,
                        Extension = System.IO.Path.GetExtension(file.FileName),
                        CreatedBy = Environment.UserName,
                        CreatedOn = DateTime.UtcNow,
                        FileBytes = filebytes
                    };
                    context.Add(fileModel);
                    context.SaveChanges();
                    TempData["Message"] = "File(s) uploaded successfully!";
                }
            }
            return RedirectToAction("Index");
        }
    }
}
Razor Index View After Running and Uploading files.

Information stored in Database table After Running and Uploading files.
 |
The logic to delete or download file is escaped in this tutorial. We can learn about it from the previous tutorial - ASP.NET Core - File Upload in Web Server


No comments:
Post a Comment